PayU | Installments
Using PayU Installments, customers have the option to divide the expense of their purchase into monthly payments of equal amounts, spread over a defined period. This approach can render larger purchases more manageable and within reach for customers who might not have the immediate funds to cover the entire cost upfront.
Service Description
- PayU | Installments are available for merchants free of charge.
- PayU | Installments are available for shopping carts worth PLN 100 to PLN 50,000 (depending on the variant).
- The service can be integrated via OpenPayU (REST API).
- The value of
payMethod(OpenPayU) orpay_type(NewPayment) parameter isai.
The process of handling payments through the PayU | Installments service in an online store involves two stages.
- A buyer places an order on an e-shop webpage.
- PayU confirms that the payment has been settled correctly.
First Stage - Placing an Order by the Customer
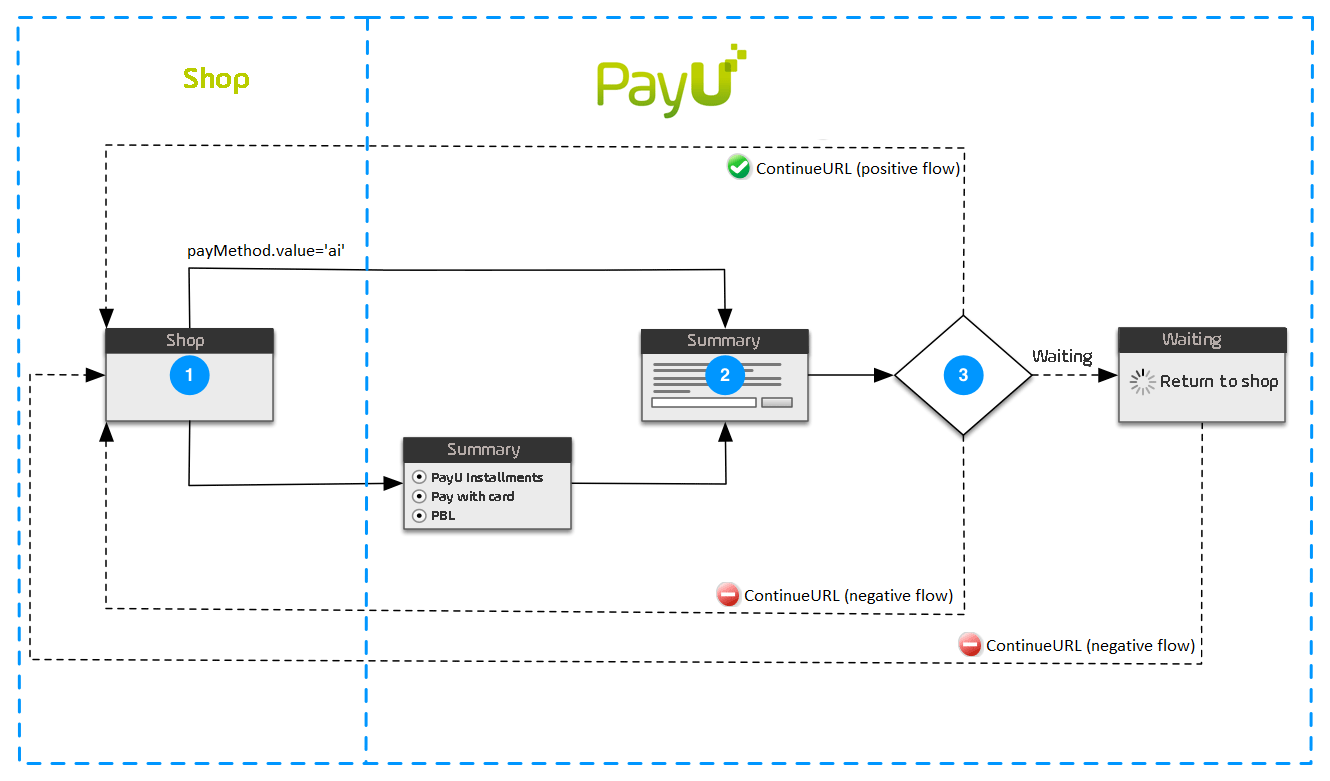
- The buyer clicks on a button that represents PayU | Installments.
- If the
payMethod.pay_typeparameter is set to a value other thanai, and both the first name and last name are not provided, the PayU system will display an order summary page. On this page, the buyer will need to confirm the payment. - The PayU system redirects the buyer to the website of a credit partner.
- The buyer performs the actions required by the credit partner, such as accepting an offer or making a verification transfer.
- Credit partner confirms to PayU that it has processed the payment and redirects the buyer back to the PayU website.
- At this stage, a transaction may receive one of three statuses depending on the loan lender's decision or ability to consider the installments request:
- In the event that the credit partner cannot promptly verify all request details or process the loan request, the transaction status will be marked as PENDING. Subsequently, the buyer will be directed to a PayU webpage containing information about the PENDING status and a button to return to the shop.
- Should a loan not be granted or the credit partner is unable to process the loan request, the transaction status will be designated as FAIL, prompting the redirection of the buyer to a page specified as a negative URL in the shop configuration.
- After the credit request undergoes assessment and gains approval, the transaction status will be updated to SUCCESS. This, in turn, will lead to the redirection of the buyer to a page specified in the shop configuration as a positive outcome.
- The PayU system redirects the buyer to a page in your system that informs the buyer that the order has been successfully placed.
Once the transaction has been confirmed manually (or automatically collected), the buyer is informed about the outcome of loan request processing.
Second Stage (optional) - Payment Settlement
- The PayU system notifies your system that the status of the payment order has changed.
- Your system confirms receiving the notification.
Integrating Installments
For PayU | Installments, the standard order request should be extended with payMethods object containing specified payment method.
curl -v -X POST https://secure.payu.com/api/v2_1/orders \
-H "Content-Type: application/json" \
-H "Authorization: Bearer 3e5cac39-7e38-4139-8fd6-30adc06a61bd" \
-d '{
    "notifyUrl": "https://your.eshop.com/notify",
    "customerIp": "127.0.0.1",
    "merchantPosId": "145227",
    "description": "RTV market",
    "currencyCode": "PLN",
    "totalAmount": "99900",
    "extOrderId":"yrjut2mp63wdzcozq7w0br",
    "buyer": {
        "email": "jan.kowalski@example.com",
        "phone": "654111654",
        "firstName": "Jan",
        "lastName": "Kowalski"
     },
     "payMethods":{
          "payMethod":{
              "type":"PBL",
              "value":"ai"
          }
      },
      "products": [
          {
              "name": "Laptop",
              "unitPrice": "99900",
              "quantity": "1"
          }
       ]
 }'
For details on parameters, please refer to Create an Order section in the Single Platform API Reference.
Highlighted within the above request are:
- The
buyerobject, which specifies basic customer information. - And the
payMethodsobject, which specifies installments (ai) as the payment method.
POS used in the example does not have installments switched on. Consequently, the Buyer won't be directed to the application form; instead, the PayU system will display a summary page.
Automatic Collection
PayU makes it possible to enable or disable the automatic receipt in a POS.
Unless you disable automatic collection on one of your POS, any transaction created with its credentials will be processed automatically without manual confirmation. If this option is disabled, you will need to manually confirm transactions in the management panel.
Manually Confirming Transaction
To manually confirm a transaction in the Management Panel when Automatic collection is disabled:
- Go to the Management Panel.
- Click on the Transactions tab. A list will appear underneath, from which select the "List of transactions" option.
- In the Status field, select "Waiting for collection". Optionally, set other search parameters.
- Click on the Show button.
- To confirm the transaction, in the Action column, click on Collect.
- Check if data is correct and click on OK button
Information about transaction support via API is available in the Capture and Cancel section.
How to promote
The objective of every e-business is to provide customers with a comprehensive and innovative offering. With the introduction of PayU | Installments, a store can accomplish this objective by presenting details about the new service in a straightforward and lucid manner.
This section outlines the process of incorporating the following components:
- Elements contributing to graphic identification, including buttons and static banners.
- Installment widget.
- Calculator widget.
These elements provide the following advantages:
- professional approach to e-shop customers;
- relevant amount of information about shopping on installments;
- keeping customers interested, thus increasing the number of successful transactions;
- allowing customers to make quick payments;
- encouraging satisfied customers to return to the e-shop.
Graphic Identification
Sign - “Here you can pay via PayU | Installments”
In order to inform a customer that you offer shopping on installments, we recommend adding the "Here you can pay via PayU | Installments" button on the main page or on other e-shop pages

A customer who clicks on the button is redirected to the informational PDF document about PayU Installments.
To produce this effect on your shop website, enter the following code:
<a href="http://www.payu.pl/en/payu-installments-for-business"
  ><img
    src="http://static.payu.com/pl/standard/partners/raty_payu/tu_kupisz_na_raty_payu_blue.png"
/></a>
Other graphic versions are available here.
Button - "Transaction"
To draw your customer's attention to quick installment shopping, use the following button:

To produce this effect on your shop website, style the form button using the following code between the <head> tags:
<style type="text/css">
  form[name="payform"] input[type="submit"] {
    border: 0px;
    height: 35px;
    width: 100px;
    background: url("http://static.payu.com/pl/standard/partners/raty_payu/raty_small.png");
    cursor: pointer;
  }
</style>
Other graphic versions are available here.
Static Banners
We have also designed static graphical ads which you can use to inform customers that PayU | Installments are available in your shop.

Other graphic versions are available here.
Credit Widget
To communicate the possibility to use a credit payment for a specific product to customers, we suggest integrating a credit widget within the product list, individual product cards, the shopping cart, and the checkout section.
The credit widget allows you to present detailed information about the possibility of paying by installments (PayU | Installments). The customer will receive information about the available crediting options for the purchase, the number of installments, interest rates.
Details related to the implementation of the widget can be found on the Credit Widget page.