Card Tokenization
Card tokenization service is based on a white-label integration type that enables you to accept card payments without redirecting users to a page hosted by the payment service provider. This integration type maintains a high level of security and reduces the effort required for PCI DSS compliance. It is designed to provide you with greater flexibility and control over the payment process, which can lead to increased conversion rates and a smoother user experience for your customers.
Overview
A payment flow consists of two steps: a front-end process and a back-end process.
In the front-end process, card credentials are securely captured, and as a result, you receive a token and a masked card number. This ensures that you never obtain the full card details, enhancing security and protecting sensitive information. In the back-end process, the token and masked card number are used to create a payment transaction, ensuring a seamless and secure payment experience for customers.
Tokens received from PayU can be categorized into two types: single-use and multi-use tokens. Single-use tokens are intended for one-time use only and cannot be stored for future transactions. On the other hand, multi-use tokens can be securely stored and reused for future payments. This feature is particularly beneficial for merchants with a large customer base of returning users. By associating a user account with a multi-use token, the payment process becomes more convenient and efficient for users, as they don't need to re-enter their card information for each transaction, leading to an improved overall user experience.
Security requirements and recommendations
Before integrating the card tokenization service, it is essential to review the requirements and recommendations provided by our security experts. These guidelines are designed to help you implement security measures and protect your business from potential frauds.
Additional Configuration
Single-use card tokens do not require additional configuration, however to enable multi-use tokens please contact PayU via your Account Manager.
Some of the older POSes can have tokenization disabled whatsoever.
Integration Overview
As mentioned earlier, card tokenization can be performed with or without storing the card details in your backend. When a customer makes a payment, they have the option to choose whether they want to save their card details and the corresponding token in your system. If they prefer not to store their card information, the tokenization process proceeds as follows:
- Integrate the Secure Form feature into your frontend, which ensures the secure collection of card details during the payment process.
- On your frontend, tokenize the card using the
SINGLEtype, generating a unique token that represents the card information. Pass this token from the frontend to your backend, where you can handle further processing. - Send an order request to PayU's API, including the token obtained from your backend.
Presented below is the flow for a white label payment without storing the card token (first payment):
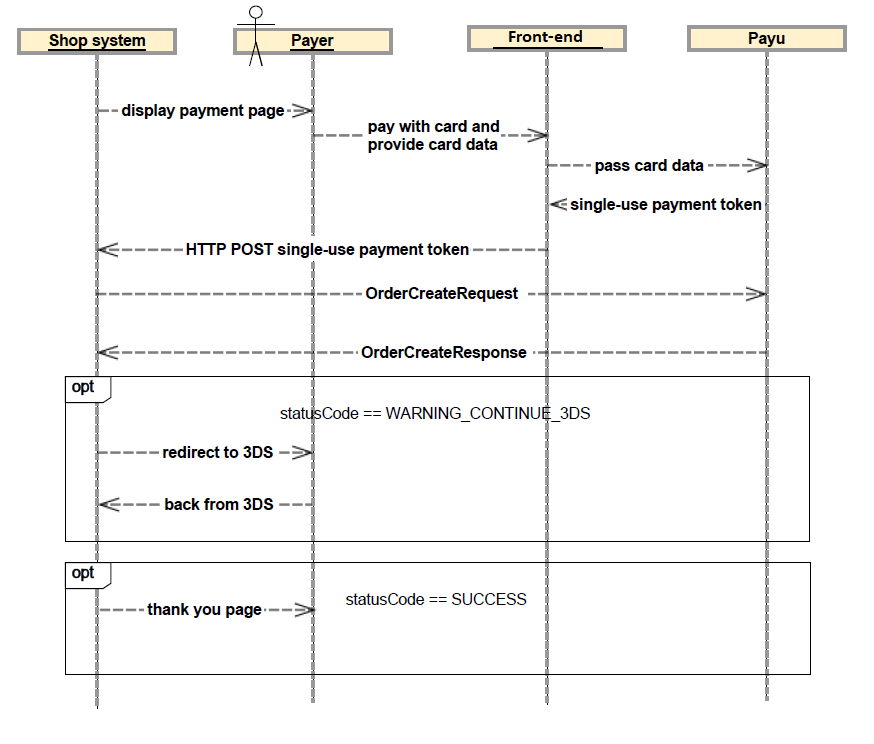
If during the first payment, your customer decides to save the card information in your system for future one-click payments, the process will look like this:
- Integrate the Secure Form feature into your frontend.
- On your frontend, tokenize the card using the
MULTItype and pass this token from the frontend to your backend. - Send an order request with the token and necessary customer details from your backend.
- Retrieve stored token(s) during subsequent checkout of this customer.
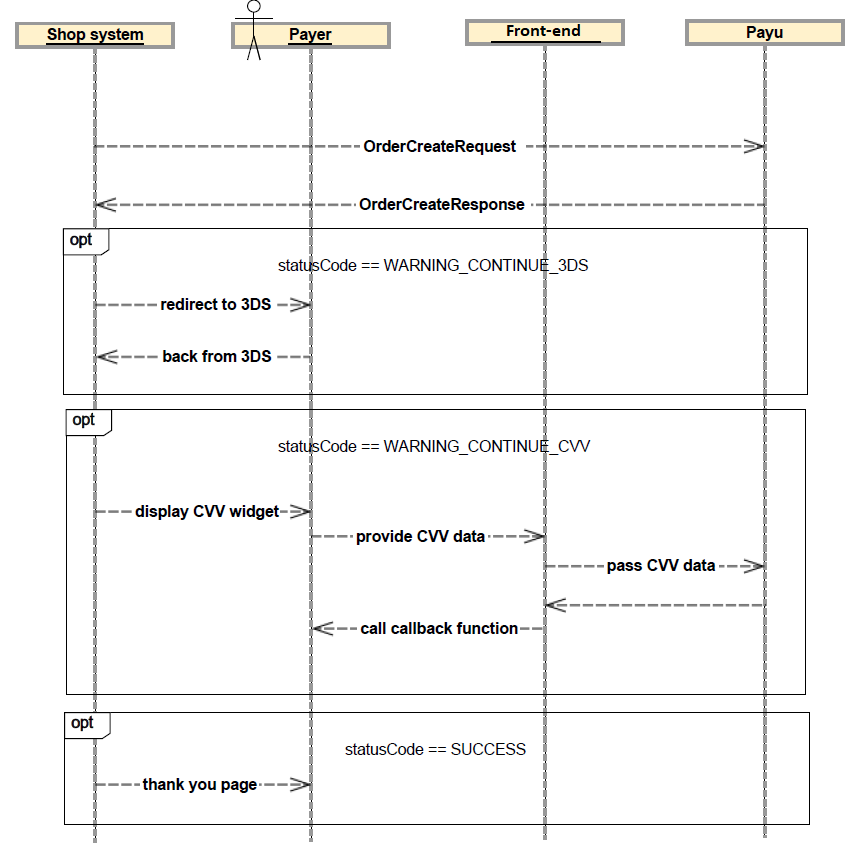
For white label payments with a multi-use token (second and subsequent payments), the flow will be as follows:
Device Fingerprint
A device fingerprint is a collection of information gathered from a remote computing device, such as a computer or smartphone, that can be used for identification purposes. Device fingerprints can be used to partially or fully identify devices or individual users, and they are often used in online security and fraud prevention systems.
Fingerprint value is generated by static function Fingerprint2.get, which replaced new Fingerprint2().get. Beacuse of this the result will not be hashed anymore.
The Fingerprint2.get function (part of the Fingerprint2 library) is used to generate the fingerprint value for a given device. However, it's important to note that using this function directly will result in a non-hashed fingerprint value. In contrast, with old new Fingerprint2().get method, where the fingerprint value was hashed for added security and privacy.
You can locate the necessary libraries here.
var options = {}
Fingerprint2.get(options, function (components) {
    // components is array of {key: 'foo', value: 'component value'}
    ...
})

// or

Fingerprint2.getPromise(options).then(function (components) {
    // components is array of {key: 'foo', value: 'component value'}
    ...
})
For creating a hash fingerprint, you can utilize the murmur hash function.
Fingerprint2.get(options, function (components) {
  var values = components.map(function (component) {
    return component.value
  })
  var murmur = Fingerprint2.x64hash128(values.join(''), 31)
})
The hash value should be included in the order body and passed to PayU as the value of the deviceFingerprint parameter.
curl -v -X POST https://secure.payu.com/api/v2_1/orders \
-H "Content-Type: application/json" \
-H "Authorization: Bearer 3e5cac39-7e38-4139-8fd6-30adc06a61bd" \
-d '{
        "notifyUrl":"https://your.eshop.com/notify",
        "customerIp":"127.0.0.1",
        "merchantPosId":"145227",
        "description":"Laptop",
        "currencyCode":"PLN",
        "totalAmount":"15000",
        "cardOnFile": "FIRST",
        "extOrderId":"60kiyw2dckg7wtjn1zl0ip",
        "products":[
            {
                "name":     "Laptop",
                "unitPrice":"15000",
                "quantity": "1"
            }
        ],
        "buyer": {
            "email": "john.doe@example.com",
            "firstName": "John",
            "lastName": "Doe",
            "language": "en"
        },
        "payMethods": {
            "payMethod": {
                "value": "TOK_1IHRPT6HKSSS3H62K0GS8pElP862",
                "type":  "CARD_TOKEN"
            }
        },
        "deviceFingerprint": "20601bbecba69f841b3d61986bf9c1f6"
    }'
Flow Examples
Here is a handy reference of all card tokenization flow types.
First Charge
Step 1 - Method: POST - Obtain OAuth access token.
Step 2 - Method: GET - Retrieve available payment methods.
Step 3 - Collect full card data via Secure Form. Retrieve card token.
Step 4 - Method POST - Prepare OrderCreateRequest (with cardOnFile or recurring parameter if required), insert one-time card token and submit the request.
Step 5 - Handle the WARNING_CONTINUE_3DS status provided in the response by redirecting the user to the url included in the redirectUri parameter, or by hnadling it in iframe.
(optional) Step 5.5 - Optionally, only when 3DS authentication took too long and CVV2/CVC2 is no longer cached by PayU: handle the WARNING_CONTINUE_CVV status added to continueUrl.
Step 6 - Receive notification with order status sent to address specfied by you in notifyUrl.
(optional) Step 7 - Method: PUT - Optionally, only when you do not have auto-receive enabled for the given payment method: capture the order.
Subsequent Charge without Card Authentication
Step 1 - Method: POST - Obtain OAuth access token.
Step 2 - Method: GET - Retrieve available payment methods - including multi-use card token.
Step 3 - Method POST - Prepare OrderCreateRequest, insert multi-use card token and submit the request.
Step 4 - Receive notification with order status sent to address specfied by you in notifyUrl.
(optional) Step 5 - Method: PUT - Optionally, only when you do not have auto-receive enabled on your POS: capture the order.
Subsequent Charge with Full Card Authentication
Step 1 - Method: POST - Obtain OAuth access token.
Step 2 - Method: GET - Retrieve available payment methods - including multi-use card token.
Step 3 - Method POST - Prepare OrderCreateRequest, insert multi-use card token and submit the request.
Step 4 - Handle the WARNING_CONTINUE_3DS status provided in OrderCreateResponse by redirecting the user to redirectUri provided in the response.
Step 5 - Handle the WARNING_CONTINUE_CVV status added to continueUrl.
Step 6 - Receive notification with order status sent to address specfied by you in notifyUrl.
(optional) Step 7 - Method: PUT - Optionally, only when you do not have auto-receive enabled on your POS: capture the order.
Subsequent Charge with Partial Card Authentication
Step 1 - Method: POST - Obtain OAuth access token.
Step 2 - Method: GET - Retrieve available payment methods - including multi-use card token.
Step 3 - Method POST - Prepare OrderCreateRequest, insert multi-use card token and submit the request.
Step 4 - Handle the WARNING_CONTINUE_3DS or WARNING_CONTINUE_CVV status provided in OrderCreateResponse.
Step 5 - Receive notification with order status sent to address specfied by you in notifyUrl.
(optional) Step 6 - Method: PUT - Optionally, only when you do not have auto-receive enabled on your POS: capture the order.
Creating Tokens
In PayU, two types of tokens are used depending on the situation: Single-use and Multi-use. Here you will learn how and when to generate them.
Charging Tokens
Learn what modifications you need to apply to the standard order request, to utilize the generated token.
Retrieving and Deleting tokens
To ensure security and accuracy, payment methods available for a user should not be stored locally on the merchant's server. Instead, they should be retrieved from the PayU system for each payment.
External 3DS
If you already have an existing integration with a provider of the 3D Secure service (3DS), you can pass the parameters that were returned from the 3DS handling process in the order request body.