Setting up Your Account
Registering with PayU
Registering with PayU is a straightforward process that involves just a few simple steps. As part of the registration, we will collect essential information about your organization. Once you initiate the registration process, you will promptly receive an email granting you access to the Management Panel. Within this Panel, you'll have the convenience to configure your account and seamlessly resume the registration, even if it gets interrupted for any reason.
To initiate the registration process, either go to the production or sandbox registration page. You can also contact your PayU partner or sales representative.
After successfully creating an account with PayU, you will gain access to the management panel specific to the environment you registered for. You can then log in to to your production or sandbox account.
To test your integration with PayU, it is highly recommended to use the sandbox environment. However, if you decide to conduct integration testing in a production environment, there are some important considerations.
Your account will not be fully active until it undergoes the verification process. During this verification period, certain features or functionalities may be limited or restricted.
To ensure a seamless experience for your users and to avoid any disruptions, it's essential to complete the verification process promptly. Once the verification is successfully completed, your account will be fully active, and you can confidently proceed with live transactions in the production environment.
What will you need?
- Documents
- Basic Data
- Company
- Website data
- Authorized persons
- PESEL of the person authorized to represent the organization.
- A scan of the ID card.
- Company documents (copy or extract from the relevant register).
- Access to a company account (from which you will make activation transfer).
- Name and surname,
- e-mail address,
- phone number,
- NIP (or other tax identifier in the case of a foreign company),
- consent to contact.
- Full company name,
- legal form,
- REGON,
- house no. / premises no.,
- zip code,
- city name.
- URL address,
- subject of services.
- Name,
- surname,
- PESEL (if none - date of birth).
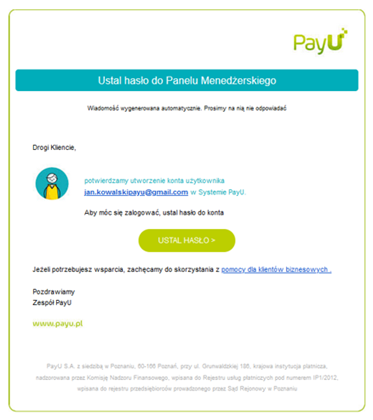
After submitting the application, you will receive an email asking you to set a password for the management panel, where your account will be automatically created. Please make sure to provide a valid email address that you can access, as this will be the main contact address for PayU-related communications.
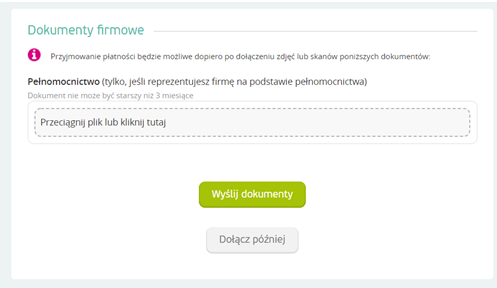
In the next steps of the registration, you will be asked to add the necessary documents - if you can't attach them right away, you can do it later, after logging into the management panel.
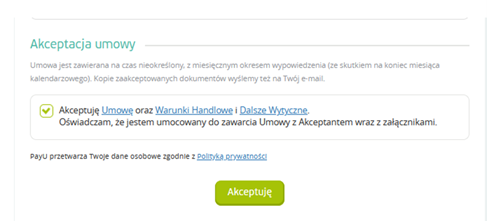
Accepting Agreements
The contract will be generated based on the information you provided in the previous steps.
Additional Documents
- A Scan of Your ID card
- Company Documents
If your organization falls under any of the following legal forms, you will be required to provide a scan of your ID card:
- business activity,
- civil partnership (documents of all partners will be needed),
- educational institution (e.g., schools, universities),
- church legal entity or its organizational unit,
- local government unit (e.g., municipalities, counties),
- a public cultural institution,
- foreign company.
For these specific legal forms, submitting a scan of your ID card is a mandatory step during the registration process. Please ensure you have the necessary documents ready to comply with this requirement.
If your organization belongs to any of the following legal forms, you will be required to attach a copy or extract from the relevant register during the registration process:
- Limited partnership:
- partnership agreement, resolution of partners (if not available in the National Court Register).
- Limited joint-stock partnership:
- Memorandum of association, shareholders' resolution (if data is not available in the KRS).
- ** Limited liability company in organization**:
- Application for KRS entry with attachments (Articles of Incorporation).
- Limited liability company:
- Memorandum of association, resolution of shareholders/assembly (if data is not available in the KRS).
- ** Joint stock company in organization**:
- Application for registration in the National Court Register with attachments (Articles of Incorporation/Company Statutes + Share Book.
- Stock Company:
- share book (if there is no sole shareholder or the company is not on the GPW),
- confirmation from the GPW (if the company is listed - screenshot from the GPW website).
- Foreign company:
- extract from the register (including name, address, NIP, representation, beneficiaries),
- sworn translation of the extract from the register (if the extract is in a language other than Polish, English or Czech,
- identity document of shareholders authorized to represent and/or proxy (if not available in the register).
- Association:
- Identity documents of persons authorized to represent (if not available in the register of associations).
- State and local government cultural institutions:
- register of cultural institutions (act of appointment of the director of the unit),
- identity document of the director,
- statutes (if not available in the registers).
- Budgetary Units:
- BIP register (appointment letter of the unit director),
- Director's identity document,
- Articles of Association (if form of representation not available in BIP).
- Universities:
- confirmation from the list of universities (appointment letter of the director of the unit),
- identity document of the director.
- Churches and religious associations:
- confirmation from the register of religious associations (pastor's appointment letter),
- identity document of the pastor/head of the religious association.
For these specific legal forms, providing a copy or extract from the relevant register is a necessary step as part of the registration requirements. Please ensure you have the required documents ready to complete the registration successfully.
If you do not have the required documents with you when you register, click Attach Later. You can also upload the documents after you log in to the management panel.
Activation fee
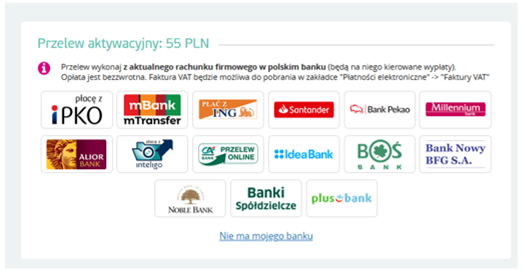
You can pay for the activation of PayU services with a quick transfer - the same as for online shopping. ** It is important to note that the transfer must be made from a business account** (in the case of a sole proprietorship, the owner's private account is accepted).
During the registration process, you will encounter the payment screen, where you can proceed with the quick transfer. Alternatively you can choose to pay later using the Management Panel (option Activation Transfer in the Registration tab). The activation transfer is necessary for PayU to start analyzing your organization's data.
If the fast transfer option is not available for your bank, select the traditional transfer option by clicking the Not My Bank button. Also select the traditional transfer option if you have a business account with one of the following banks:
- ING (for sole traders only),
- Millennium,
- Crédit Agricole (for sole traders only),
- BOŚ,
- Bank Nowy BFG S.A (for sole traders only),
- Noble Bank,
- Banki Spółdzielcze,
- Plus Bank.
Next, you need to configure your account in the management panel as described in Management Panel section.
Verification Transaction
To complete the account verification, you need to conduct the first actual transaction in the public version of your service. The total transaction limit during verification is 2,500. Once this is done, your account will be fully verified and ready for regular use.
During the verification process, the transaction has a status of waiting for collection. Do not send orders before the status of the transaction is changed to ended.
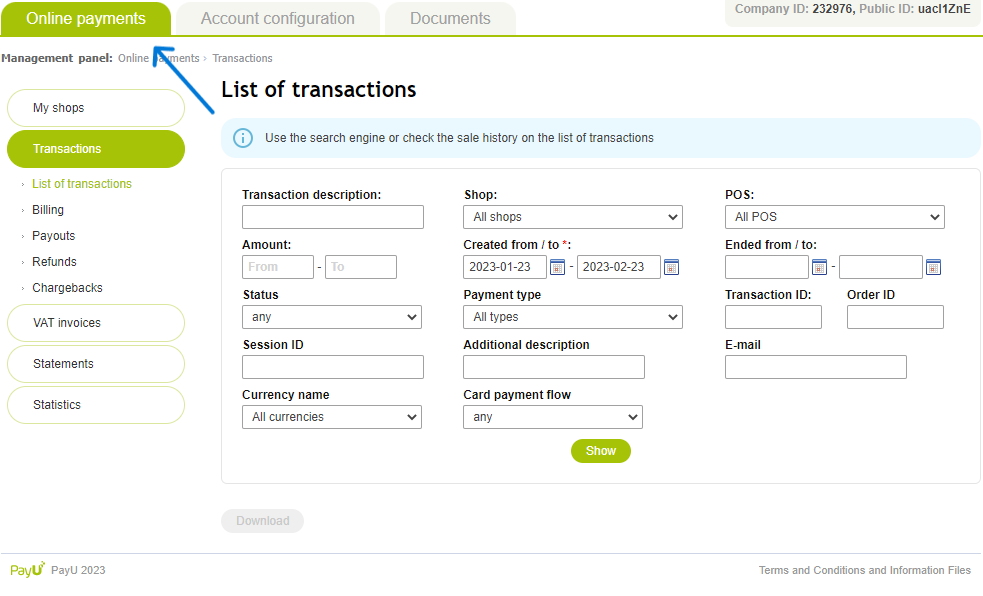
Management Panel
PayU provides a convenient management panel where you can efficiently oversee and handle all the transactions that PayU processes on your behalf. This centralized platform allows you to have complete control over your transaction records, enabling easy monitoring and management of payment activities.
The Management Panel is a user interface of the PayU application provided to registered PayU users. From the panel, you can, among other things, accept (with automatic receipt disabled), cancel, refund or withdraw funds. Here you can create shops and payment points (POS), in which you can view the balance of processed transactions and other related details. You can also generate reports or view transaction history.
The management panel consists of three main tabs, each serving specific purposes:
-
Online Payments: This is the primary tab where you can access comprehensive information related to established shops, payment points, transactions, and detailed reports.
-
Account Configuration: In this tab, you can manage the company's registration data, contact information, and user details associated with the account.
-
Documents: The Documents tab allows you to conveniently add and view any required documents requested by PayU during the registration process.

Shop
In the management panel, the primary entity is a "shop." A shop serves as the central hub for managing incoming transactions processed by PayU. You can effectively oversee and handle transactions related to each individual shop.
Each shop is associated with a specific currency, predetermined by you. This currency serves as the designated one for the funds deposited into that particular shop.
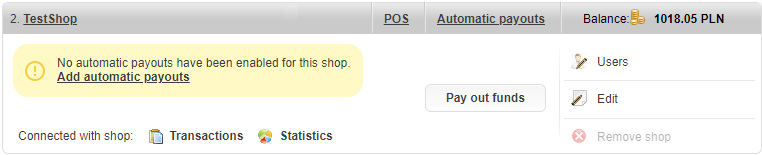
You can set up multiple shops on your account, and each shop will have a separate balance, transaction history and payment points. Each URL from which transactions are processed must have a separate shop.
Until your company is activated, you may add a maximum of 3 shops.
Adding a Shop
To create a shop in the PayU Management Panel:
- Go to the Online Payments tab.
- Select the My Stores tab from the sidebar.
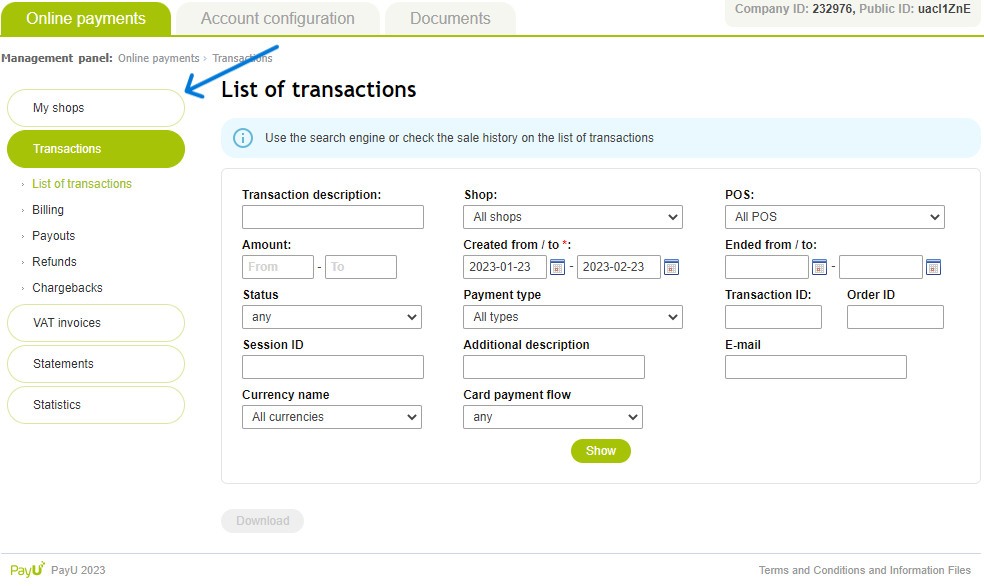
- Click the Add shop button.
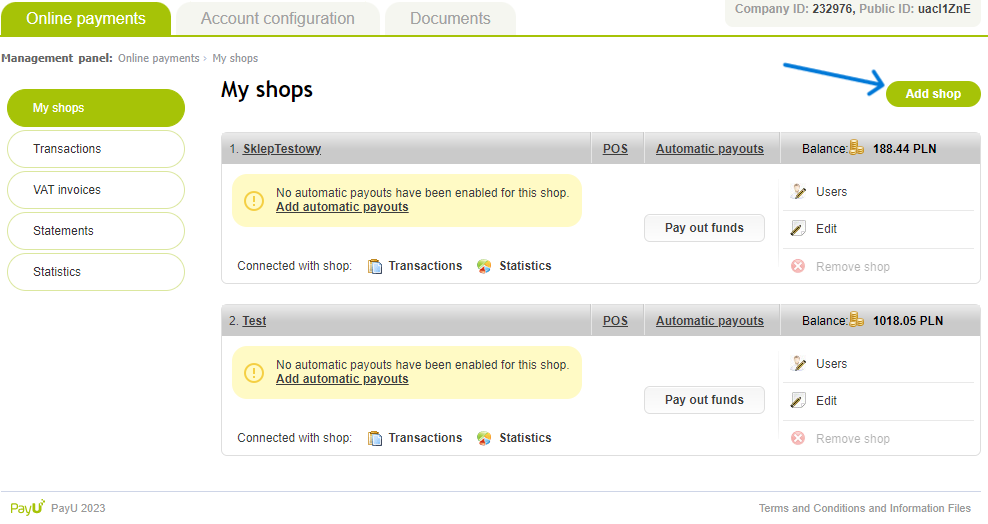
At this point, you will be shown the first step of a short three-step process. Follow the instructions and you will soon have access to a new shop with a payment point and new authorization credentials.

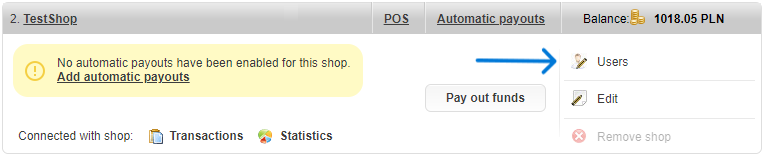
Adding Additional Users
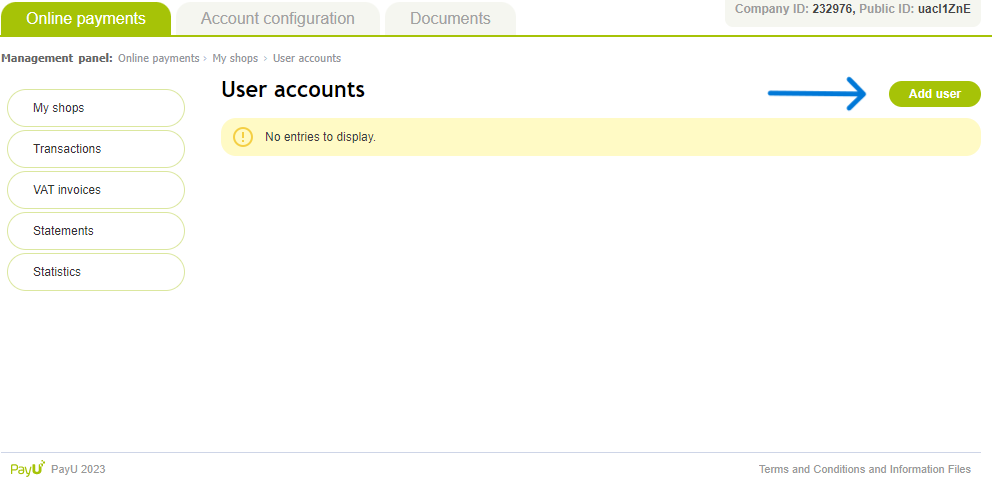
- To add a new user for the specific shop you have to choose the Users option on the shop tile.
- You will see user management panel where you will find all users that you created. If you want to add new user press the Add user button.
- Next you will see the user creation form where you will need to enter the user's details such as: email address, first name, last name and phone. You will also need to specify the user's type, which determines their level of access.
... the email address used to create the user will be a username required to log in to the user's account.
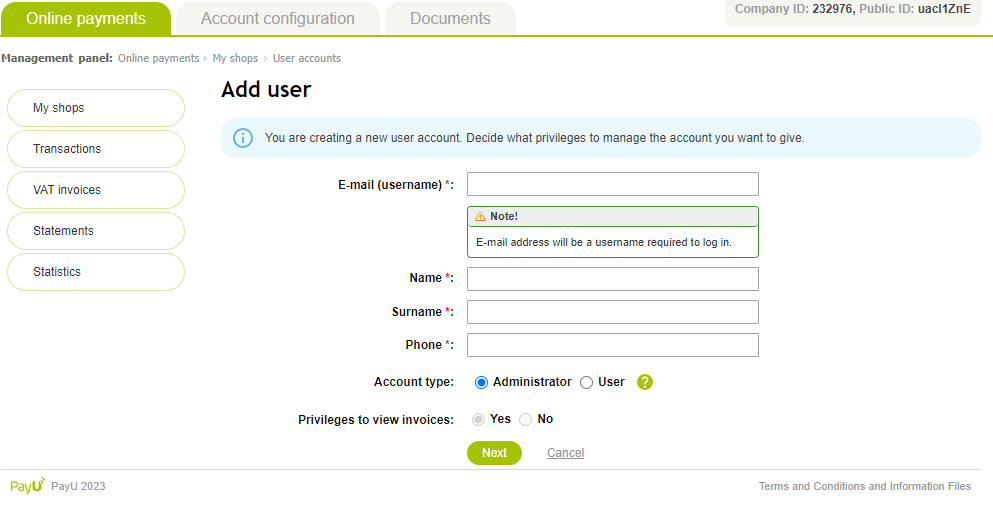
Depending on the chosen account type, users will have varying levels of access within the management panel. The access level will be tailored to the specific account type and its associated permissions.
- Administrator
- User
Administrator has access to every option in the shop.
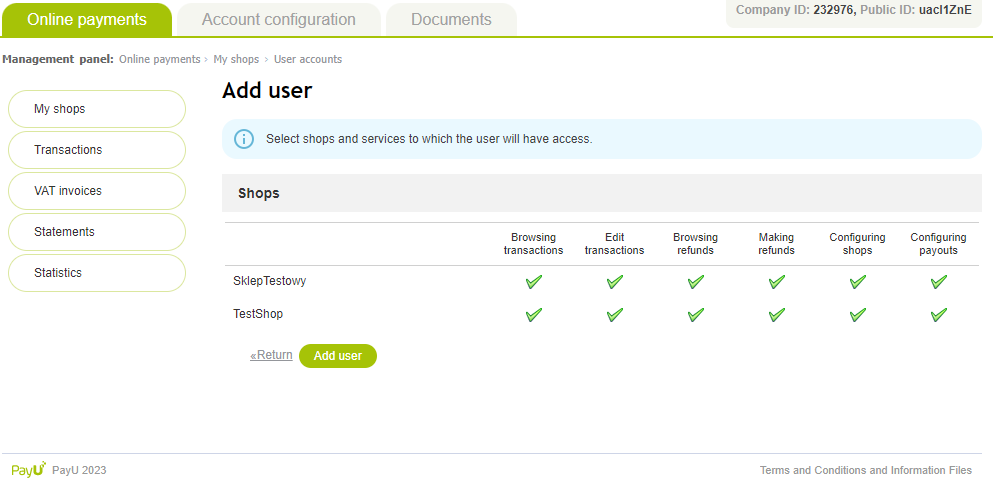
On the other hand, normal users can have their permissions changed on the fly.
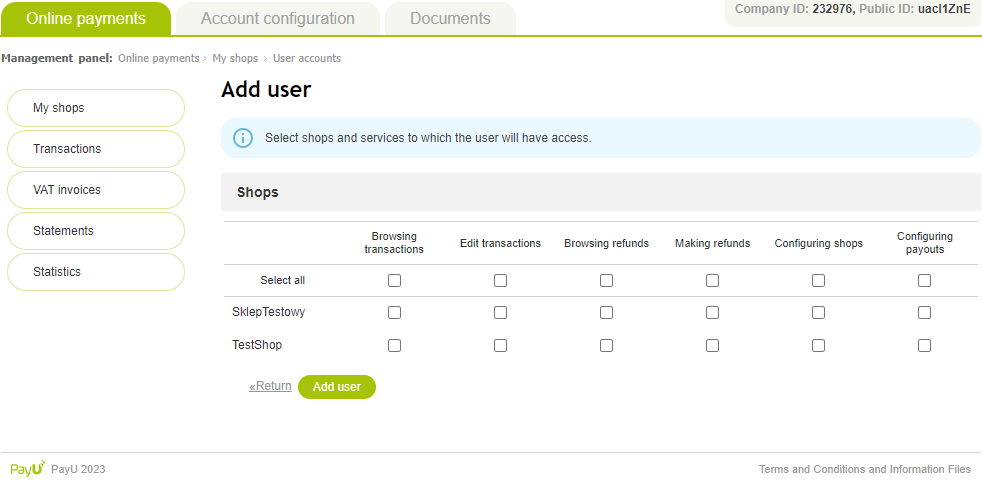
- After setting the user's access level, press Add user to complete the process and create the new user.
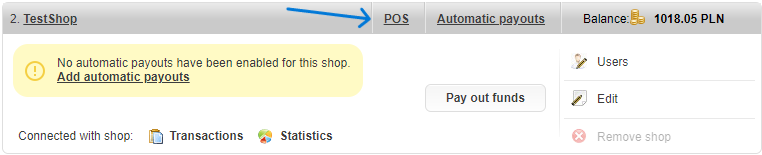
Point of Sale (POS)
A point of sale (POS) is a set of settings, related to how an order can be paid and how it should be presented to the payer. Each POS can have separately defined payment methods and parameters of offered services. The first POS is set up when a particular shop is created. Subsequent POS, if required by your business, can be created by yourself.
Until your company is activated, you may add a maximum of 3 POSes in scope of one shop.
Each POS contains configuration keys that are required to authorize and create of transaction requests in PayU.

- client_id - is the POS identifier for which the transaction will be carried out,
- client_secret - is an authorization key to authenticate a request for a specific POS.
Never share your keys!
Adding POS
As was mentioned earlier, the first POS is created when you set up your store. You can set up subsequent POS yourself by going to the POS tab on the shop tile.
You will see a screen with a selection of previously created POSes and two buttons to set up new ones.
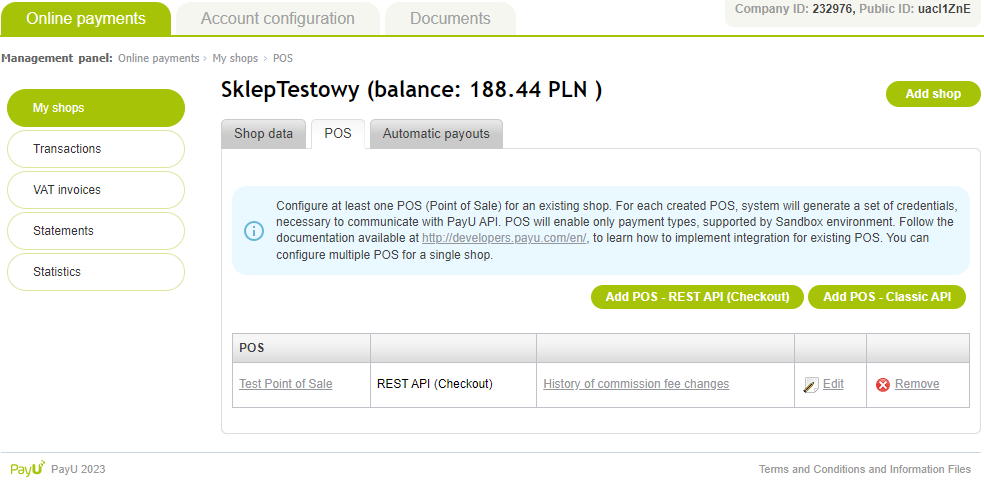
Two types of POS are available: REST API (Checkout) and Classic API.
-
REST API - The standard way to integrate with PayU. Allows you to support all PayU payment channels (this is the recommended option, as Classic API is not actively developed anymore),
-
Classic API - Non-standard method of integration with PayU. If you choose this option, you will also need to select data encoding and provide URLs: return (after erroneous and correct payment) and reports (skip this field if your store does not provide customers with information about the transaction status changes).
Once you have created a POS, you will have access to basic information about it:
- its name and the data coding type,
- configuration keys that are used while creating an order,
- payment methods that are available on this specific POS.
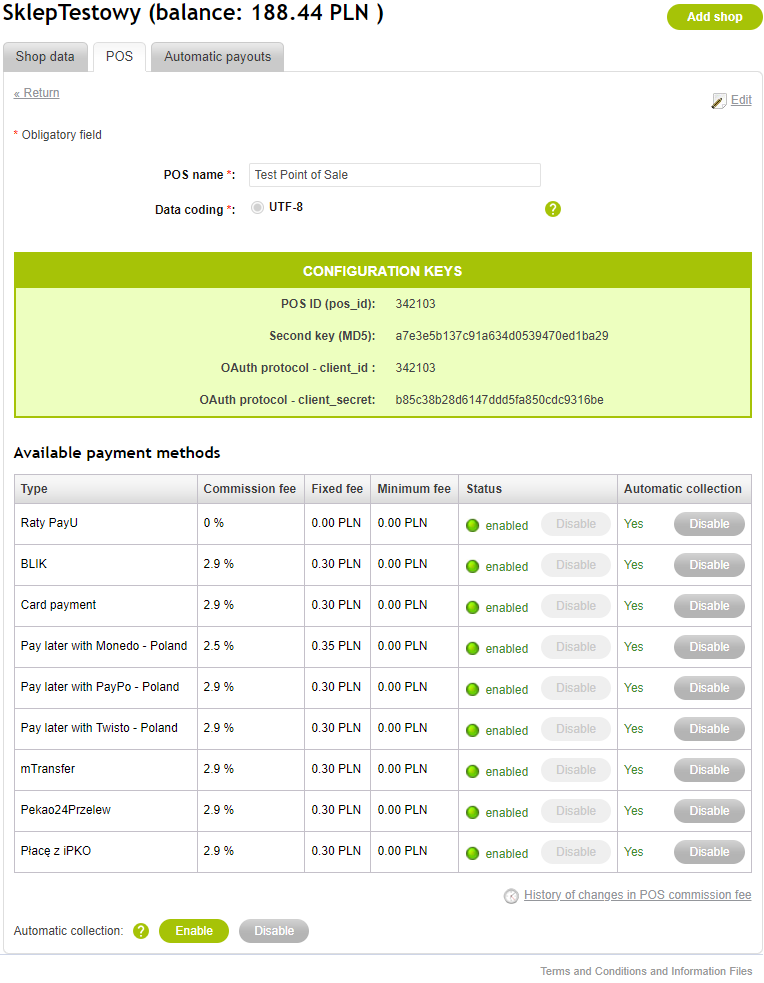
Managing Automatic Collection
In the POS configuration tab, you can manage automatic collection for each payment method available at this POS. Just go to the Automatic collection column, where you can enable or disable it for each payment method individually.
This is all you need to get started with PayU, we recommend for you to browse through the panel and get familiar with it. If you have some questions please contact our customer support or ask your sales representative in PayU.