PayU | Mobile

1 PayU | Mobile

Mobile SDK gives a set of Android and iOS mobile components for: pay-by-link, one-time card payments, storing card options, scanning card data, and one-click payments (Google Pay, Apple Pay, BLIK). Card is processed via PayU Backend and SDK sends request, but each merchant will receive card tokens in retrieve method(), so the card data does not go through merchant backend. User Interface in Mobile SDK can be adjusted to merchant branding/style guide.

Recommended implementation flow

Merchant Server- PayU Server/Backend means that call is made from merchant server to PayU REST API. MobileApp means that action is called inside merchant mobile application. Mobile SDK heavily depends on communication between merchant and PayU backends. SDK won't create order for merchant so this responsibility will be ceded to merchant server. With this approach there is no need to create and use mobile oAuth token, but merchant application will need to pass all important data to SDK.
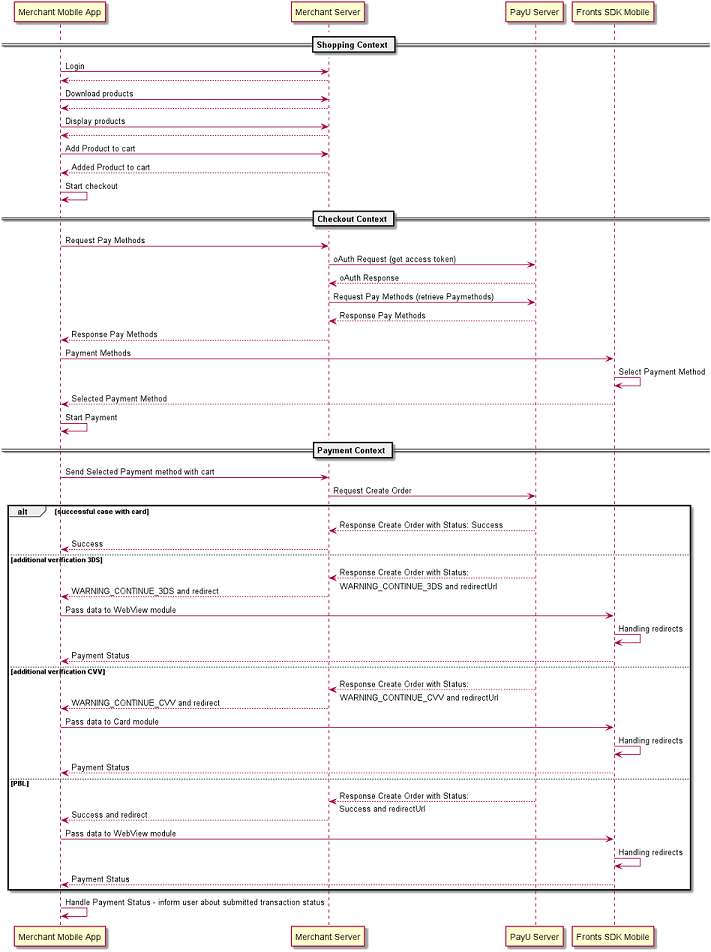
Example for card payments:

  1. [Merchant Server- PayU Server/Backend] This access to all payment methods stored for end user on PayU Backend, some of payment method should be individually configured on POS. Retrieving payment methods. (scope trusted_merchant, gives access to private user methods, such as stored cards)
  2. [MobileApp -Mobile SDK] Inject retrieved payment methods to Payment Chooser module,
  3. [Mobile SDK]When card is tokenized inside Mobile SDK (or explicite by merchant) card payments, component returns TOK_, which is single time token,
  4. [Merchant Server- PayU Server/Backend] Create Order with single time token: Single time token. (response for Order creation may be: SUCCESS, WARNING_CONTINUE_3DS, WARNING_CONTINUE_CVV; please note that it is not payment status, payment status will be sent via notification),
  5. [MerchantServer-MobileApp-Mobile-SDK ] In case of status response such as: WARNING_CONTINUE_3DS and WARNING_CONTINUE_CVV, redirect user to the URL sent by PayU,
  6. [Merchant Server- PayU Server/Backend] Get payment notification status: Notifications.

Test application

You can try the test application, which can be found on github.

General Payment flow for Android and iOS:

  • Shopping Context is Merchant Exclusive Flow
  • Checkout Context is a part when merchant need to obtain payment methods from PayU backend. For this merchant needs to implement: oAuthRequest & retrieve payment methods request.
SDK needs to be populated by provided payment methods
  • Payment Context is a transaction part. When merchant on backend create an Order Create Request. This request start transaction process.
In response to OCR merchant can receive different status from PayU backend. Chart inform merchant about most common payment flow with additional information how to handle them.
  • PayU Server - payment processor that handle payment transactions
  • Fronts SDK Mobile - handle additional verification for Payments, adds components for displaying and selecting payment methods, all data needs to be passed from Merchant Mobile App.
  • Merchant Mobile App - app that sell products or services
  • Merchant Server - communicates with PayU Server & Merchant Mobile App, server is used for creating transactions.
Backend developers needs to implement: oAuthRequest, RetrievePaymentMethodRequest & OrderCreateRequest.
Widget can display different types of payments method (depends on POS configuration, xml configuration and data that was provided by merchant/backend - retrieve ):
  • PBL (Pay By Links)
  • PEX (Pay By External)
  • Card
  • Google Pay
  • BLIK

1.1 Android and IOS libraries

Changes applied in each new version can be found in Changelog.

Android

Android releases are available on jfrog. To preview it go to PayU's jfrog artifactory.

If you want to use it in your app add this line to gradle repositories:

maven { url "https://payu.jfrog.io/payu/mobile-sdk-gradle-local" }

IOS

Documentation for IOS version can be found in Github repository.

Releases of iOS version can be also found on Cocoapods.

2 Implementation guide for Android

2.1 Service Description

Mobile SDK is a library that will handle full payment process for your products. It is created for more advanced merchants and consist of three components that could be used independent or could coexist to create better UI:

  • payment-library-chooser-module - Main function of this library is to present user a widget for selecting Payment. In base configuration user will see PBL payment, for other payment type please contact IT support for changing POS configuration. This library contains card module so without additional work you can add a card from a widget. Card can be added manually and can be stored on PayU backend or via scanning a real card with adding sub-library and set scan property to true. This widget can pass token value to OCR and can be extended for selecting GP, BLIK payments. Currently supported payments: GP, PBL, PEX, BLIK, Card.
  • payment-library-add-card-module - This module is responsible for handling cards (adding new card & CVV ) in payment process. It contain information how to handle form (NewCardView) that lets user input card data. Merchant can decide if he would like to use logic and network layer or his own logic for handling adding a card. We are supporting Payment Process after creating an OCR (order created request) by adding CVV view that lets user input a 3 digit code. This library needs configuration of POS.
  • payment-library-webview-module - This module is responsible for handling web payments payments (PBL, PEX, 3DS). Payments are handled inside WebView. To utilize this library you need to create OCR with PBL/PEX or 3DS payment type. The trickiest part of this library is continueUrl.
As well as two additional components for Google Pay implementation:
  • payment-library-google-pay-module - This library handle creating Google Pay token for PayU backend to utilize it. This payment needs to be configured on POS. Google Pay is supporting test environment out of the box, so each merchant can verify if payment workflow is working as it should. To "unlock" production environment in Google Pay payments please contact Google Pay (there is a high possibility that application will need to be verify by Google).
  • payment-library-google-pay-adapter - This is a bridge between widget and GP payments. If you would like to use GP payments on Widget please use this library.

New Mobile SDK requires Android 4.4 + and working POS on PayU's Production and Sandbox (copy of Production environment that can be used for integration and testing purposes) environments.

2.2 Retrieving Payment Methods

Payment-library-chooser-module is a component that helps merchant with presenting and retrieving selected Payment Method by the end user. This component is integrated with payment-library-add-card-module so in addition to selecting payment method, user can add a card to PayU server.
Before implementing module you should have:

Sample use case for payment-library-chooser-module:

  • Add Product to cart - User adds product to cart
  • Request Pay Methods - App sends request to retrieve payment methods
  • OAuth Request - Authorization token is requested from PayU server
  • OAuth Response - Token is returned
  • Request Pay Methods- Authenticated request is forwarded to PayU backened
  • Response Pay Methods - Payment Methods are retrieved
  • Payment Methods - Mobile SDK shows retrieved payment methods in merchant app
  • Request add new Card - Tokenize sended card on PayU backend
  • Response add new Card - Card is saved
  • Select Payment Method - Payment method is chosen in SDK
  • Selected Payment Method - Process goes back to merchant app to finalize transaction
  • Checkout/Payment Process - Payment process will start on merchant backend

PayU payment method selector without chosen method

Selecting payment methods screen:

Select payment method is main View in Mobile SDK. It consists of PayU (in default view) or merchant icon, footer that contains information about PayU as Payment Processor and list with possible payment options - first is always last selected Payment method, below are: Google Pay, BLIK, added cards, at the bottom there are two buttons Add Card (add new card with one payment token), Bank Transfer (select PBL payments).

PBL chooser screen

Grey payment methods are currently disabled. All payment methods can differ from the above screenshot.

General Configuration

XML Configuration for functions in SDK

Create XML file name payu.xml (in res/values/ directory) or if you created it already put keys in existing payu.xml file - this file is needed for all configurations.

                    <?xml version="1.0" encoding="utf-8"?>
                    <resources> xmlns:tools="http://schemas.android.com/tools" tools:ignore="TypographyDashes"
                        <string name="payu_language">auto </string>
                        <string name="payu_payment_methods_fully_qualified_name">com.payu.android.front.sdk.demo.DemoMethodsActions
                        </string>
                        <string name="payu_environment">sandbox</string>
                        <bool name="payu_save_and_use_card">false</bool>
                        <bool name="payu_add_card_option">true</bool>
                        <bool name="payu_card_scanner">true</bool>
                        <bool name="payu_blik_payment">true</bool>
                        </resources>
                
Parameter name Parameter type Description
payu_language string Supported values are: auto (default: english, will try to use translations: polish, english, german, hungarian, czech or slovak), polish, english, german, hungarian, czech or slovak. In case of auto if possible library will try to use device language, if not possible library will be using English translations.
payu_payment_methods_fully _qualified_name string Full name of class (with package) that will provide PaymentMethods to SDK.
payu_environment string supported values are production and sandbox
payu_payment_dynamic_card _configuration_qualified_name string Full name of class (with package) that will provide dynamic card option. This parameter is optional. Class should extend DynamicCardActions and constructor should pass context as parameter. If this parameter is used other static parameters for card are ignored: payu_save_and_use_card, payu_add_card_option, payu_card_scanner.
payu_save_and_use_card boolean Is responsible for showing or hiding "save and use" button on add card view in payment-library-chooser-module:
  • true (default if not set)
  • false
payu_add_card_option boolean Is responsible for showing or hiding add card button on selecting payment method screen in payment-library-chooser-module. Without it user cannot add new card:
  • true (default if not set)
  • false
If set to 'true' merchant PosId has to be provided (POS should be configured for card tokenizinig).
payu_card_scanner boolean Is responsible for unlocking card scanner module in payment-library-chooser-module:
  • true
  • false
payu_blik_payment boolean Is responsible for showing or hiding BLIK payment method on selecting payment method screen in payment-library-chooser-module:
  • true
  • false(default if not set)

PosId should be provided dynamically by overriding PaymentMethodActions:providePosId method. This method passes listener, which should be called, right after posId becomes available. Snippet with sample implementation can be found below. While implementing this method, super.providePosId() SHOULD NOT be called (it would cause NotImplementedException to occur).

                public class PaymentMethodsActionsImpl extends PaymentMethodActions {
                ....
                @Override
                public void providePosId(@NonNull PosIdListener posIdListener) {
                posIdListener.onPosId("301948");//YOUR_POS_ID, POS SHOULD match environment : production/sandbox
                }
                }
            

Gradle (For alpha builds) - Setting up library

Extract obtained archive into your local maven repository

Add mavenLocal() to your repositories:
                    allprojects {
                    repositories {
                    mavenLocal() //<------
                    google()
                    jcenter()
                    }
                    }
                
As well as dependency to library in your app/build.gradle file:
                    dependencies {
                    ...
                    implementation "com.payu.android.front.sdk:{MODULE_NAME}:{LIBRARY_VERSION}" //check
                    library version at the top of the file
                    ...
                    }
                    
                
Presented below is table with possible MODULE_NAMES:
Library MODULE_NAME
Choosing Payment Method payment-library-chooser-module
Card Scanner payment-library-card-scanner
Google Pay payment-library-google-pay-module
Google Pay adapter payment-library-google-pay-adapter
Add Card payment-add-card-module
Webview payment-library-webview-module

Pass Retrieve methods

SDK in new approach needs to receive data obtained from PayU backend from merchant. Merchant needs to pass PaymentMethod(s) to SDK that was received from PayU backend. To pass payment methods please extends class by PaymentMethodActions - class is responsible for communication between PayU SDK and Merchant application with two important methods: providePaymentMethods() and onPaymentMethodRemoved().

providePaymentMethods(PaymentMethodsCallback callback) - This method will be called by the PayU SDK every time, when Payment methods are needed. After fetching available payment methods from PayU backend, callback's PaymentMethodsCallback.onFetched() method has to be called. To ensure proper PayU SDK behaviour, the response from backend must be parsed as-is. PayU light SDK is supporting PBL (including Blik Payments, GP Payment) and CardPayment. Callback is an interface, which need to be notified with fetched payment methods

PaymentMethodsCallback is used for communicating about received payment methods. onFetched(List<PaymentMethod> paymentMethods) should be called after payment methods have been received from Merchant backend. Payment methods should be created using builders provided by PaymentMethodCreator.

PaymentMethodCreator is a helper class which provides builder for creating PBL and Card payment objects with methods cardBuilder() and pblBuilder().

                public class DemoMethodsActions extends PaymentMethodActions {
                
                private final List<PaymentMethod> paymentMethods;
                
                    public DemoMethodsActions(Context context) {
                    super(context);
                    paymentMethods = Arrays.asList(
                    //How to use a builders in creating paymentMethods
                    PaymentMethodCreator.pblBuilder()
                    .withName("Name")
                    .withValue("B")
                    .withBrandImageUrl("https://static.payu.com/images/mobile/logos/pbl_blik.png")
                    .withStatus("ENABLED")
                    .build(),
                    
                    PaymentMethodCreator.cardBuilder()
                    .withBrandImageUrl("https://static.payu.com/images/mobile/visa.png")
                    .withCardExpirationMonth("12")
                    .withCardExpirationYear("2018")
                    .withCardNumberMasked("411111******1111")
                    .withCardScheme("VS")
                    .withValue("VALUE")
                    .withPreferred(false)
                    .withStatus("ACTIVE")
                    .build());
                    }
                    
                    @Override
                    public void providePaymentMethods(final PaymentMethodsCallback callback) {
                    //fetch data from backend
                    new Handler().postDelayed(new Runnable() {
                    @Override
                    public void run() {
                    callback.onFetched(paymentMethods);
                    }
                    }, 20);
                    }
                    
                    @Override
                    public void onPaymentMethodRemoved(PaymentMethod paymentMethod) {
                    //call to backend to remove payment method
                    }
                    }
            

Removing selected method

onPaymentMethodRemoved(PaymentMethod paymentMethod) is called when paymentMethod has been removed by the user. Provided paymentMethod can only be of a type CardPaymentMethod (others payment methods will be removed locally (if possible) and restored when application will reset). It should be removed from the PayU backend using delete token method. This method can be triggered when end user will long press on PaymentMethod or when end user will swipe payment method.

Retrieving Selected Method

To get payment method call getPaymentMethod() on PaymentChooserWidget. You can also check if there is any selected payment method by calling isPaymentMethodSelected().

Card scanner module

This option can be unlocked in CreateAndSelectCardActivity(view that handles adding new card). It is an additional option that lets user add new card to widget and PayU environment. Card scanner scans only front part of the card (card number & date). We are using 3rd party card scanner.

To unlock cardScanner in Widget please add new property to xml file

                <bool name="payu_card_scanner">true</bool>
            

Add new library to project

                com.payu.android.front.sdk:payment-library-card-scanner:version
            

version - is a current version of other modules that are used in app.

Additional information about changes in Merchant APP for Card Scanner

Card Scanner needs Camera permission it is special for Android as:
  • There will be a need to add in Google Play store link to regulations,
  • If you publish app before adding this feature in older Android version user will need to update manually an app as to agree to new permission.

Enabling New Blik Payments

At the start there is a possibility to use BLIK as PBL payment method. From user perspective steps looks like:
  • Press on Widget
  • Press on Bank Transfer button
  • Select "BLIK"
  • Payment process will be handled by WebView container with redirection system.
Payment in New Blik will be different from previous Blik payment. To unlock new payment type please contact with PayU Support or your contact on PayU site to configure POS for BLIK 2.0. Technical documentation can be found here.

Selected BLIK as a payment method

Setup on Mobile

Turning new BLIK requires adding new flag to xml file:
                    <bool name="payu_blik_payment">true</bool>
                
If this property is not added then default value will be false.

With this property set to true library won't filter any BLIK payment methods. Default location for BLIK payments is PaymentMethodActivity (Select payment method screen).

In case when user didn't retrieve any BLIK payment method library will add one generic "BLIK" item that will be seen above card payment method. After selecting generic BLIK payment user will need to input 6 digit value from bank application. On the other hand when retrieve payment methods return BLIK payment method user don't need to input 6 digit value as it is not mandatory.

Builder for creating BLIK as Payment Method
                    PaymentMethodCreator.blikPaymentBuilder()
                
Handling Selecting BLIK Payments by user
                    PaymentMethod paymentMethod = paymentChooserWidget.getPaymentMethod().getValue();
                    if (paymentMethod != null) {
                    switch (paymentMethod.getPaymentType()) {
                    case BLIK_GENERIC:
                    if (paymentChooserWidget.isBlikAuthorizationCodeProvided()) {
                    Log.v(TAG_BLIK_PAYMENT, "General Blik Payment: " + paymentChooserWidget.getBlikAuthorizationCode());
                    } else {
                    Toast.makeText(RollSummaryActivity.this, "Blik code is not provided", Toast.LENGTH_SHORT).show();
                    }
                    break;
                    case BLIK_TOKENS:
                    if (paymentChooserWidget.isBlikAuthorizationCodeNeeded()) {
                    if (paymentChooserWidget.isBlikAuthorizationCodeProvided()) {
                    Log.v(TAG_BLIK_PAYMENT, "Saved Payment with provided blik code " + paymentChooserWidget.getBlikAuthorizatio
                    nCode());
                    } else {
                    Toast.makeText(this, "Blik code is not provided", Toast.LENGTH_SHORT).show();
                    }
                    } else {
                    Log.v(TAG_BLIK_PAYMENT, "Saved Blik Payment with provided token (without 6 digit code) " +
                    paymentMethod.getValue());
                    }
                    break;
                    }
                    }
                

BLIK_GENERIC - is a payment when user does not store any BLIK payments in PayU environment so in this case user is required to input 6 digit code

BLIK_TOKENS - is a payment that was stored by user and can be reused (it contains token on PayU backend and can be obtained from retrievePaymentMethodRequest) or user can input new code for this payment.

For better handling of BLIK payments we added new method for PaymentChooserWidget:
  • boolean isBlickAuthorizationCodeNeeded() - this flag indicate if user should input Blik Code
  • String getBlikAuthorizationCode() - code inputted by user, can be null
  • boolean isBlikAuthorizationCodeProvided() - check if user inputted full 6 digit code
After selecting BLIK you need to retrieve value or blikCode and need to pass it to OCR.

Handling more than one BLIK - Ambiguity

In case when user select BLIK as payment and create an OCR with it PayU backend can return AUTH_TOKEN_NONUNIQUE. This status code inform that the end user has more than one BLIK token saved in bank and merchant should check blikData params and present possible BLIK payments to user.

In case of Android please implement provideBlikPaymentMethods() from PaymentMethodActions abstract class. This method should be populated by response from OCR with status code AUTH_TOKEN_NONUNIQUE.

BLIK - saved applications chooser screen

Sample implementation of provideBlikPaymentMethods():
                    @Override
                    public void provideBlikPaymentMethods(final @NonNull PaymentMethodsCallback callback) {
                    new Handler().postDelayed(new Runnable() {
                    @Override
                    public void run() {
                    callback.onFetched(bliks);
                    }
                    }, 2000);
                    }
                
Builder for BlikAmbiguityPaymentMethod
                    PaymentMethodCreator.blikAmbiguityPaymentMethodBuilder()
                    .withKey("testKey")
                    .withLabel("testLabel")
                    .build()
                
To handle Ambiguity in SDK call Service for displaying a List with possible BLIKs in new Activity
                    BlikAmbiguityService.selectAmbiguityBlik(context);
                
Selected BLIK will be provided in onActivityResult
                    @Override
                    protected void onActivityResult(int requestCode, int resultCode, Intent data) {
                    if (requestCode == BlikAmbiguityService.REQUEST_CODE) {
                    PaymentMethod paymentMethod = BlikAmbiguityService.extractSelectedBlikResult(data);
                    Log.v(TAG, "Selected Blik Method: " + paymentMethod.toString());
                    }
                    }
                
This payment method contains field value that should be pass to OCR as appKey field.

Widget

To utilize look of of custom widget please add:

com.payu.android.front.sdk.payment_library_payment_chooser.payment_method.external.widget.PaymentChooserWidget. Widget will have different states accoridng on user actions (selected payment method/no selected payment method).

                <com.payu.android.front.sdk.payment_library_payment_chooser.payment_method.external.widget.PaymentChooserWidget
                    android:id="@+id/selected_payment_textView"
                    android:layout_width="match_parent"
                    android:layout_height="wrap_content"
                    android:layout_gravity="center"
                    android:background="@color/background_payu_widget"
                    android:padding="@dimen/padding_large" />


To clear currently selected payment method and remove all fetched methods from widget please call cleanPaymentMethods() on PaymentChooserWidget.

2.3 Google Pay

To enable Google Pay in PayU | Mobile you should have configurated POS with Google Pay enabled on PayU backend as well as implemented two modules:

payment-library-google-pay-module - supports Google Pay payments in PayU on Android platform. To fully utilize this feature please contact PayU support to turn on Google Pay payment on PosId assigned to you.

payment-library-google-pay-adapter - should be used to enable Google Pay payments on the Payment Method list. (This module is strongly dependent on payment-library-chooser-module and payment-library-google-pay-module and cannot be used without them.)

Use of Google Pay requires:
  • Android version >=19,
  • Google Play services version >=11.4.x,
  • Google account linked on given device.

Integration

GooglePayService class is the main entry point for Integration with Google Pay Android API. There are three main steps that should be performed:

To perform sample test payment, proper google account with at least one production card added to Google Pay (payments.google.com) should be logged in the test device. For payment process this card should be selected. When sandbox environment is selected in the configuration, Google Pay SDK returns test token with no real information about card, so the card will never be charged.

                <resources xmlns:tools="http://schemas.android.com/tools" tools:ignore="TypographyDashes">
                <string name="payu_language">auto</string> // This will not be required in future releases. Keep it for now
                <string name="payu_environment">sandbox</string>
                </resources>
            

Check if Google Pay payment can be performed on the device.

This step should be performed prior to showing Google Pay as payment method. Google Pay should only be shown as possible payment method after receiving confirmation that Google Pay can be used on the device.

To check if Google Pay can be used on the device GooglePayService#isReadyToPay method should be called.

                public void isReadyToPay(@NonNull final GooglePayVerificationListener isGooglePayPossibleListener) {
                googlePayHandler.isReadyToPay(isGooglePayPossibleListener);
                }
            

Param isGooglePayPossibleListener handle verifying device response from Google API.

See Google requirements for the device.

GooglePayVerificationListener passed as an argument to this method is responsible for passing results to the the application. This listener has two methods for the merchant to implement: GooglePayVerificationListener#onVerificationCompleted and GooglePayVerificationListener#onException

                public interface GooglePayVerificationListener {
                /**
                * Method called when Google Pay status has been obtained
                *
                * @param verificationStatus - The status of the verification. Google Pay payments should be performed only
                on
                * {@linkplain GooglePayVerificationStatus#SUCCESS}
                */
                void onVerificationCompleted(GooglePayVerificationStatus verificationStatus);
                /**
                * There was an exception when trying to connect to Google API
                */
                void onException(@NonNull Exception exception);
                }
            

This listener should be implemented by merchant and should be passed to GooglePayService#isReadyToPay(GooglePayVerificationListener)

For more information check: Google Pay documentation isReadyToPay API

Enum with Google Pay verification statuses. Only SUCCESS should enable Google Pay payment

                public enum GooglePayVerificationStatus {
                /**
                * Verification of Google Pay availability was successful. GooglePay can be used as Payment method
                */
                SUCCESS,
                /**
                * Android version is to low. Google Pay is available from Android 4.4+
                */
                ERROR_API_VERSION,
                /**
                * Google Play services version is to low. User need to upgrade it before continuing
                */
                ERROR_GOOGLE_PLAY_SERVICES_VERSION,
                /**
                * Google Play services are not available. User need to install them before continuing
                */
                ERROR_GOOGLE_PLAY_SERVICES_UNAVAILABLE,
                /**
                * Unknown error is preventing user from making Google Pay payment
                */
                ERROR_UNKNOWN
                }
            

payment-library-google-pay-adapter

This module ads GP payment on Payment-library-chooser-module and should be visible on main select screen. To integrate it follow integration steps for payment-library-chooser-module. Make sure that there is Google Pay payment method in the retrieve call.

To enable Google Pay on Payment method list use following code in the Activity#onCreate:

                @Override
                protected void onCreate(@Nullable Bundle savedInstanceState) {
                ...
                googlePayService = new GooglePayService(this);
                paymentChooserWidget.setPaymentMethodsAdapter(new GooglePayAdapter(googlePayService));
                ...
                }
            

Request Google Pay payment

Requesting Google Pay payment is the most important method of this module. Parameters passed as the arguments are used for Google Pay token creation. PosId has to be passed as well in order assign payment to proper POS.

Cart object should be created using Cart.Builder class as shown below. The price is positive integer. Supported currencies are: enum Currency.PLN, enum Currency.CZK, enum Currency.EUR, enum Currency.GBP, enum Currency.USD, enum Currency.DKK, enum Currency.NOK, enum Currency.SEK.

                private Cart createCart() {
                return new Cart.Builder()
                .withTotalPrice(1000) //10.00 as an integer
                .withCurrency(Currency.PLN)
                .build();
            

To start payment process call GooglePayService#requestGooglePayCard() method. This method takes Cart and PosId as arguments and can take boolean shouldCardPickerBeDisplayed - sets whether the UI you show the payment method or shipping address selection is required to be shown in the purchase flow, default value is set to true, if you would like to hide Google Pay selector UI check this page.

                /**
                * Requesting GooglePay Card. UI with selecting card will always be shown.
                * Call this method after {@linkplain GooglePayService#isReadyToPay}
                * Result will be passed to {@linkplain Activity#onActivityResult}
                *
                * @param cart - Cart object with the information about Currency and payment amount
                * @param posId - PosId used for this payment. To learn more about POS please check
                */
                public void requestGooglePayCard(@NonNull Cart cart, @NonNull String posId) {
                }
            

Or

                /**
                * Requesting GooglePay Card.
                * Call this method after {@linkplain GooglePayService#isReadyToPay}
                * Result will be passed to {@linkplain Activity#onActivityResult}
                *
                * @param cart - Cart object with the information about Currency and payment amount
                * @param posId - PosId used for this payment. To learn more about POS please check
                *
                * @param shouldCardPickerBeDisplayed - Sets whether the UI to show the payment method or shipping
                * address selection is required to be shown in the purchase flow
                *
                public void requestGooglePayCard(@NonNull Cart cart, @NonNull String posId, boolean shouldCardPickerBeDispl
                ayed) {
                }
            

PaymentDataRequest.Builder - Google official documentation

Call example

                googlePayService.requestGooglePayCard(
                createCart(),
                "posId");
            

Parse result to receive encoded Google Pay token

Results (either successful, canceled or failed) of GooglePayService#requestGooglePayCard() call are passed to Activity#onActivityResult() method.

To proceed with Google Pay process override onActivityResult() in your calling activity. If requestCode is equal to GooglePayService#REQUEST_CODE_GOOGLE_PAY_PAYMENT, response can be parsed to obtain results.

Checking resultCode would help to identify whether the action has been performed successfully or not. Possible values are:

Parameter name Description
Activity.RESULT_OK This indicates successfully Google Pay card retrieval. Data intent should be passed to GooglePayService#handleGooglePayResultData.
Activity.RESULT_CANCELED User has canceled Google Pay payment process.
GooglePayService.RESULT_ERROR An error has occurred during payment process.

Success response

To obtain encoded token, data intent should be passed to GooglePayService#handleGooglePayResultData

                /**
                * Call this method in {@linkplain Activity#onActivityResult} result for {@link #REQUEST_CODE_GOOGLE_PAY_PAY
                MENT} request code.
                * <p>
                    * return {@link GooglePayTokenResponse} with payment token or null, if there is no token in response
                    */
                    @Nullable
                    public GooglePayTokenResponse handleGooglePayResultData(@NonNull Intent data) {
                    return googlePayHandler.handleGooglePay(data);
                    }
            

GooglePayTokenResponse would be returned, encapsulating encoded token. This token should be sent to PayU backend in the create order request.

PayU backend might ask for additional 3DS verification as a result of order creation. In this case please use WebPaymentModule to support this payment.

Error response

In case of receiving error response from Google Pay, ErrorStatus with additional data can be obtained by calling googlePayService#handleGooglePayErrorStatus.

                /**
                * Handle error response from Google Pay API
                *
                * @param data - Intent data from {@linkplain Activity#onActivityResult} resultCode {@linkplain #RESULT_ERROR}
                * @return ErrorStatus mapped from Google Pay Status.
                */
                public ErrorStatus handleGooglePayErrorStatus(Intent data) {
                Status statusFromIntent = AutoResolveHelper.getStatusFromIntent(data);
                return ErrorStatus.fromGooglePayStatus(statusFromIntent);
                }
            

ErrorStatus contains error codes from Google Pay Service. For more information about possible status codes please see StatusCodes

Sample Code - Parse results

                if (requestCode == GooglePayService.REQUEST_CODE_GOOGLE_PAY_PAYMENT) {
                if (resultCode == Activity.RESULT_OK) {
                GooglePayTokenResponse googlePayTokenResponse = googlePayService.handleGooglePayResultData(data);
                }else if (resultCode == RESULT_CANCELED){
                //User has canceled payment
                }else if (resultCode == GooglePayService.RESULT_ERROR){
                //Payment process has failed for the user
                ErrorStatus status = googlePayService.handleGooglePayErrorStatus(data);
                }
            

Production environment

Google Pay payments won't work out of the box on production environment. It needs additional configuration:
  • configure production POS (please contact PayU support or your business partner) to utilize new payment gate
  • contact Google for verification of mobile application
  • additional information: gateway - PayU, Merchant_ID = Gateway_Merchant_ID = POS

In case when there is a dialog: "Realizacja żądania nie powiodła się. Ten sprzedawca nie obsługuje GooglePay" application is configured for production (property "production" was set on mobile device), but app did not pass Google certification process (please contact Google Support). There are some merchant that prefer only this kind of payments so with using only Google Pay payments module payment path is really simple.

2.4 Add Card Module

Add card module is used to add new payment card by the user to PayU endpoint. if you use payment-library-chooser-module you get this component out of the box. This component also makes it easier for the Merchant application to make payment with card and handle WARNING_CONTINUE_CVV after creating an OCR (More information).

Prerequisites for using this library:

Add Card Flow:

  • Add Product to card - User add Product to cart
  • Add Card - On mobile checkout screen user select add card
  • Add Card - Open Merchant View with add-card-module
  • Request add new Card - Tokenize sended card on PayU backend
  • Request add new Card/Return Card token - Send token to merchant mobile App
  • Checkout/Payment Process - Finish local checkout
  • Checkout/Payment Process - Payment process will start on merchant backend

Add card module screen

This view is part of the Payment-chooser-module. Add Card module ads input fields for adding new card, but buttons and theirs translations should be provided by merchant. Requests for tokenazing the cart are part of the library - request will return one time card token (that could be changed after payment to one-click token)

Custom view/layout

To utilize look of custom widget please add com.payu.android.front.sdk.payment_add_card_module.view.NewCardView to your layout.

                <com.payu.android.front.sdk.payment_add_card_module.view.NewCardView
                    android:id="@+id/new_card_view"
                    android:layout_width="match_parent"
                    android:layout_height="wrap_content" />
            

Add Card Logic

To utilize add card logic please create object CardServiceTokenizer and call method: addCardWithAgreement(posId) or addCardWithoutAgreement(posId), both method calls internal method isCardValid(). After positive validation in callback there should be created token for only one time usage, in first case (with agreement) after finishing the payment process, new payment method (card) will be visible in payment methods.

To create instance of CardServiceTokenizer call NewCardService.newInstance().

                /**
                * @param view {@linkplain NewCardView} customView for adding new card
                * @param context
                * @param callback {@linkplain NewCardCallback} will be invoked when adding a card to PayU backend process was finished
                */
                public static CardServiceTokenizer newInstance(@NonNull NewCardView view, @NonNull Context context, @NonNull NewCardCallback
                callback) ;
            
Custom view that is served by PayU contains of:
  • CardNumberInput
  • DateInput
  • CvvInput
  • PayU footer
Merchant is responsible to add button(s) for sending a request using one or both provided method: CardServiceTokenizer#addCardWithAgreement(posId) and/or CardServiceTokenizer#addCardWithoutAgreement(posId).

When creating an instance of CardServiceTokenizer class Merchant should provide Callback

                public interface NewCardCallback {
                /**
                * Return one time token for card payment
                *
                * @param cardPaymentMethod - payment method which can be used to proceed with payment process
                */
                void onSuccess(CardPaymentMethod cardPaymentMethod);
                /**
                * Return an error that was passed from network or from PayU servers
                * {@linkplain Error}
                * PayUStatusCodes{@linkplain com.payu.android.front.sdk.payment_library_api_client.internal.rest.model.Open
                PayuStatusCode}
                *
                * @param error - information about current issue with tokenize the card
                */
                void onError(Error error);
                }
            

Method onSuccess will pass CardPaymentMethod with information about added Card, the most important thing is token: CardPaymentMethod.getValue(),this value should be passed to order in payMethod object.

Method onError should inform about communication issues, to check what kind of error was thrown check Error.getErrorLiteral()

Standard responses for card payment

Responses are standard responses for cards, the most important ones are: SUCCES, WARNING_CONTINUE_3DS, WARNING_CONTINUE_CVV. For details and other response codes please refer to: Status codes

Dynamic Card Options

In order to use this functionality you have to add new xml key:

payu_payment_dynamic_card_configuration_qualified_name

Example:

<string name="payu_payment_dynamic_card_configuration_qualified_name">com.payu.android.front.sdk.demo.config.DynamicCardPayment</string>

The key should point to the dynamic configuration class, which should implement DynamicCardActions interface.

Example:

public class DynamicCardPayment implements DynamicCardActions {
    public DynamicCardPayment(Context context) {
    }
    
    private boolean addCard = true;
    private boolean saveAndUse = false;
    private boolean scanCardOption = false;
    
    @Override
    public boolean addCardFlow() {
        return addCard;
    }
    
    @Override
    public boolean saveAndUseOption() {
        return saveAndUse;
    }
    
    @Override
    public boolean scanCardOption() {
        return scanCardOption;
    }
}


Adding this key ignores the rest of the static configuration for the card (scanning, saving card, adding card).

Handling CVV

Receiving WARNING_CONTINUE_CVV status code while creating Order on PayU backend means that there is a need for additional validation for end user. If there won't be any action payment process will be canceled.

Sample response from createOrder:

                {
                    "status":{
                        "statusCode":"WARNING_CONTINUE_CVV",
                    },
                    "redirectUri":"{redirect_url}",
                    "orderId":"WZHF5FFDRJ140731GUEST000P01",
                    "extOrderId":"{your_order_id}",
                }
            

CvvValidationService#validateCvv() method should be called to start the process. Method signature can be seen below:

                /**
                * Starting point for CVV validation. Response would be provided in the
                CvvValidationListener#onValidationCompleted(CvvPaymentStatus)
                *
                * @param activity - Current foreground activity, which will obtain results
                * @param authorizationDetails - AuthorizationDetails with {@linkplain PaymentAuthorization#CVV}
                authorizationType
                * and link obtained from orderCreateRequest(redirectUri field}.
                * Visit <a href=https://developers.payu.com/en/restapi.html#creating_new_order}>Rest Api docs</a> for more
                * information
                * @param cvvValidationListener - The Listener, which methods would be called with Cvv Payment status {@link
                plain CvvPaymentStatus}
                */
                public static void validateCvv(@NonNull Activity activity, @NonNull AuthorizationDetails
                authorizationDetails, @NonNull final CvvValidationListener cvvValidationListener)
            

CvvValidationService is used as an entry point for CVV validation during payment process in case of receiving WARNING_CONTINUE_CVV response code in order create request.

                CvvValidationService.validateCvv((Activity)this,
                new AuthorizationDetails.Builder()
                .withLink("redirectUrl received during creation")
                .build(),
                new CvvValidationListener() {
                @Override
                public void onValidationCompleted(@NonNull CvvPaymentStatus cvvPaymentStatus) {
                //Handling Payment Status
                }
                });
            

Possible payment status codes are defined in CvvPaymentStatus.

                public enum CvvPaymentStatus {
                /**
                * Successful transaction
                */
                SUCCESS,
                /**
                * Transaction failed (e.g. timeout)
                */
                PAYMENT_ERROR,
                /**
                * Transaction cancelled by user
                */
                CANCEL_PAYMENT
                }
            

In case of SUCCESS status, payment has been processed successful, but it has to be verified with PayU backend.

CVV dialog box

2.5 Webview Module

Main purpose in using this module is to help end user successfully pay via PBL (online payment), or handle additional verification 3DS, PEX, and won't leave the application prematurely. This not means that the cash was transferred from user to merchant - this needs additional time to process. This module consist of Android widget - webview. PBL (Pay By Links) & 3DS are types of payment when user needs to use browser to pay for the purchased products.

Example of payment-library-webview-module - handling PBL payment:

  • Checkout/Payment Process - User select pay with PBL (login to specific bank and pay)
  • Checkout/Payment Process - At the end of local check out request is send to merchant backend to create an order on PayU side
  • Checkout/Payment Process - Response from created order is passed from merchant backend to Mobile SDK (via mobile app)
  • Handle User Payment - payment-library-webview-module check if user paid for shopping using selected bank
  • Payment Status - Status code is passed to mobile app

Base flow for 3DS looks the same as PBL payments.

Initial conditions
  • Order with PBL was successfully created and placed.
  • Order Response contained at least redirectUrl.

Order with PBL

                {
                    "continueUrl": "https://your.eshop.com/", // this value can determine path for redirect Url in mobile web components
                    "notifyUrl": "https://your.eshop.com/notify",
                    "customerIp": "127.0.0.1",
                    "merchantPosId": "PosId",
                    "description": "RTV market",
                    "currencyCode": "PLN",
                    "totalAmount": "1000",
                    "buyer": {
                        "email": "john.doe@gmail.com",
                        "phone": "666*****6",
                        "firstName": "John",
                        "lastName": "Doe",
                        "language": "pl"
                    },
                    "settings":{
                        "invoiceDisabled":"true"
                    },
                    "products": [
                        {
                            "name": "Wireless Mouse for Laptop",
                            "unitPrice": "500",
                            "quantity": "1"
                        }
                    ],
                    "payMethods":{
                        "payMethod":{
                            "type":"PBL",
                            "value":"o"
                        }
                    }
                }
            

Its important to pass correct continueURL parameter to Mobile SDK in order to end payment process.

Status Success - it means that the transaction finished successfully on mobile, but merchant need to receive notification from payU backend that bank proceed the payment; the criteria are: last redirect url was continueUrl with query parameteres (without error & without failure keywords) or without any query.

Status Error/Failure - it means that the transaction finished with an issue & criteria are: last redirect url was continueUrl with query parameters Error or Failure

After passing URL you are redirected to the financial institution site, because of this you are leaving PayU page for a moment. Any occuring errors e.g. with SSL (this can happen when certificates are wrongly configured or out of date) are not caused by PayU.

Payment Authorization

Currently there is a support for two types of Payment Authorization in WebView:
  • PAY_BY_LINK - when PBL was selected as payment method
  • 3DS - when received "WARNING_CONTINUE_3DS"

Dynamic Configuration

Create object AuthorizationDetails with using AuthorizationDetailsBuilder with setting at least Link from redirectUrl & continueUrl:

                new AuthorizationDetails.AuthorizationDetailsBuilder()
                .withAuthorizationType(PaymentAuthorization._3DS) (or PaymentAuthorization.PAY_BY_LINK)
                .withContinueUrl("http://my.shop.pl/") //needed for payments, this url is a property that could be passed
                //in OrderCreateRequest or it is a shop page that was verfied by PayU Administrators
                .withLink("https://merch-prod.snd.payu.com/np/newpayment.resume.action?paymentId=73443832&hash=1dc257ebb8dbfa3fef322ff4052325
                1b&js=1") //redirect link from OCR request
                .build();
            

It will be good to pass orderId and PaymentId, but this properties are optional and will be returned only if they were passed to mobile SDK (Full list of properties).

Authorization details should be passed:

WebPaymentService.pay(activity, authorizationDetails)

Previous, starter Activity will be informed in onActivityResult() method when payment process will end.

Status codes in enum:

Status Code Description
SUCCESS Successful transaction
PAYMENT_ERROR Transaction failed (e.g. timeout)
SSL_VALIDATION_ERROR Transaction failed - SSL Validation failed for given url. Please contact provider of mentioned web page
CANCEL_PAYMENT Transaction cancelled by user
WARNING_CONTINUE_CVV Transaction needs to be confirmed by CVV code

Intent in onActivityResult() will contain a Parcelable with key: "INTENT_WEB_PAYMENT_EXTRA".

                @Override
                protected void onActivityResult(int requestCode, int resultCode, Intent data) {
                    if (requestCode == WebPaymentService.REQUEST_CODE) {
                        PaymentDetails paymentDetails = WebPaymentService.extractPaymentResult(data);
                        Log.v(TAG, paymentDetails.toString());
                    }
                }
            

In some cases (if your POS is not configurated for this) there could be a need to handle additional payment verification after 3DS payment.

In this case WARNING_CONTINUE_CVV will be returned as a payment status. This can be handled by other component - payment-add-card-module.

PEX (Pay by External)

This type of payment works same as PBL.

Only Condition for PEX is OCR created with it as a PaymentType:
                    "payMethods":{
                    "payMethod":{
                    "type":"BANK_TOKEN",
                    "value":"{pex_token}"
                    }
                    }
                
And response to it with statusCode WARNING_CONTINUE_REDIRECT with redirect url:
                    {
                    "orderId": "ZGKCGS ... 01",
                    "status": {
                    "statusCode": "WARNING_CONTINUE_REDIRECT"
                    },
                    "redirectUri": "....test.payudc.net/np/newpayment"
                    }
                
This information should be provided to handle PEX payment type:
                    new AuthorizationDetails.Builder()
                    .withLink("...test.payudc.net/np/newpayment")
                    .withContinueUrl("http://multishop.dev.payudc.net/")
                    .withAuthorizationType(PaymentAuthorization.PEX)
                    .build();
                
and this object should be passed to WebPaymentService
                    WebPaymentService.pay(activityContext, authorizationDetails);
                

2.6 Visual adjustment

Custom PayU payment method selector with chosen method

Selector components explanation
  • 1. payu_styles_textStyleHeader (main name of selected Payment Method)
  • 2. payu_styles_textStyleDescription (secondary information, for example: card Number)
  • 3. payu_styles_accentColor is used for background

Custom Merchant Style for Select Payment Method (with Google Pay configured)

Select Payment Method Chooser components explanation
  • 1. Toolbar icon can be changed to display different image
  • 2. Toolbar text has style payu_styles_textStyleTitle
  • 3,5,10,12. This textView uses style: payu_styles_textStyleDescription
  • 4,6,9,11. This textView uses style: payu_styles_textStyleHeadline
  • 7. Card icon can be changed to display different image
  • 8. Bank icon can be changed to display different image
  • 13. Adding new card can be turned off please check XML Properties in this module
  • 14. You may also change the color of background with using color: payu_styles_backgroundColor - default color is #FCFCFC
To Items we are applying payu_styles_textStyleButtonBasic.

Custom Merchant style for Add Card Module

Add Card Module components explanation
  • 1. Toolbar icon can be changed to display different image
  • 2.Toolbar text has style payu_styles_textStyleTitle
  • 3,4,5. payu_styles_textStyleInput (textColor & textSize ) with payu_styles_windowContentPadding propeties set , default style changes that depends on Android Platform API to TextInputEditText will be automatically integrated by Android
  • 6. If "save and use" button is not disabled by configuration this button use payu_styles_textStyleButtonPrimary
  • 7. If "save and use" button is not disabled by configuration this button use payu_styles_textStyleButtonBasic in other case: payu_styles_textStyleButtonPrimary
  • 8. Background property: payu_styles_backgroundColor with use of padding payu_styles_windowContentPadding

Custom CVV dialog box

CVV Dialog box components explanation
  • 1. payu_styles_textStyleInput (textColor & textSize )
  • 2. possitive color is taken from: payu_styles_accentColor
  • 3. negative color is an alpha from textColor

Custom Merchant style for PBL chooser screen

PBL chooser components explanation
  • 1. Toolbar icon can be changed to display different image
  • 2. Toolbar text has style payu_styles_textStyleTitle
  • 3. Background property: payu_styles_backgroundColor with use of padding payu_styles_windowContentPadding
  • 4. To Items we are applying payu_styles_textStyleButtonBasic

Custom Merchant Style for About screen

About screen components explanation
  • 1. Toolbar icon can be changed to display different image to know more check sample code section in General Configuration
  • 2. Toolbar text has style payu_styles_textStyleTitle
  • 3, 5. This textView uses style: payu_styles_textStyleDescription
  • 4,6,7,8. This textView uses style: payu_styles_textStyleText
  • 9,10,11,12. Separators use color: payu_styles_separatorColor - default is #906f7476
You may also change the color of background with using color: payu_styles_backgroundColor - default color is #FCFCFC.

Style configuration

Each module can be configured to utilize defined by merchants branding: Colors, fonts, paddings and other xml properties. To change styles you should create class that extends abstract class BaseStyleConfiguration.There are four methods that can be overrided:

Method name Description
pathIconPBLPayment() provided path to resource in res/drawable/ file, the icon will be displayed in PayByLinkButton in payment-library-chooser-module
pathIconAddNewCard() provided path to resource in res/drawable/ file, the icon will be displayed in AddNewCardButton in payment-library-chooser-module
payuLibraryIcon() provided drawable will be used as library icon visible in toolbar in all modules
PayuStyle() provided style should extends: @style/Theme.PayU.Fronts

XML Configuration for functions in SDK

Create XML file name payu.xml (in res/values/ directory).

Created Style class should be provided to SDK, (if this won't be done fronts sdk will be using default colors). To provide class please add new string to resource file:
                    <string name="payu_style_class_fully_qualified_name">packageName.ClassName</string>
                
for example:
                    <string name="payu_style_class_fully_qualified_name">com.payu.android.front.sdk.config.MerchantStyle</string>
                

To utilize new style you should extend yours style from Theme.PayU.Fronts in styles.xml file.

                <style name="MerchantStyle" parent="Theme.PayU.Fronts">
                <item name="payu_styles_toolbarColor">@color/background_toolbar</item>
                <item name="payu_styles_backgroundColor">@color/background_main</item>
                <item name="payu_styles_separatorColor">@color/background_item</item>
                <item name="payu_styles_primaryColor">@color/colorPrimary</item>
                <item name="payu_styles_accentColor">@color/colorAccent</item>
                <item name="payu_styles_windowContentPadding">15dp</item>
                </style>
            

Below you can find properties of base style that can be changed:

  • payu_styles_backgroundColor
  • payu_styles_toolbarColor
  • payu_styles_separatorColor
  • payu_styles_fontColor
  • payu_styles_primaryColor
  • payu_styles_accentColor
  • payu_styles_windowContentPadding
  • payu_styles_textStyleButtonBasic
  • payu_styles_textStyleButtonPrimary
  • payu_styles_textStyleTitle
  • payu_styles_textStyleHeader
  • payu_styles_textStyleHeadline
  • payu_styles_textStyleDescription
  • payu_styles_textStyleText
  • payu_styles_textStyleInput

Widget Styles

If there is a need you may configure 8 widgets styles that and can be divided in 3 categories: text (title, header, headeline, description, text), button (buttonBasic and buttonPrimary) and inputText (input).

Text styles

Text properites (title, header, headeline, description, text) extendsStyle.PayU.Fronts.Text with additional properties fromTheme.PayU.Fronts:

  • payu_styles_textColor
  • payu_styles_textSize
  • payu_styles_font
  • payu_styles_paddingBottom
  • payu_styles_paddingTop
  • payu_styles_paddingLeft
  • payu_styles_paddingRight

To configure Title style please extend your style byTextAppearance.PayU.PrimaryHeaderText and add reference to it in payu_styles_textStyleTitle tag in Theme.PayU.Fronts.

For configuration of Header Style please extends your style byTextAppearance.PayU.SecondaryHeaderText and add reference in payu_styles_textStyleHeader tag.

To utilize Description please extends style byStyle.PayU.Fronts.DescriptionText and put a reference to it in payu_styles_textStyleDescription tag.

To utilize Headline please extends style by Style.PayU.Fronts.HeadlineText and put a reference to it in payu_styles_textStyleHeadline tag.

To utilize Text please extends style by Style.PayU.Fronts.NormalText and put a reference to it in payu_styles_textStyleText tag.

Button styles

Button has two predefined styles: buttonBasic, buttonPrimary.

ButtonBasic extends Style.PayU.Fronts.Text and has additional property:

  • payu_styles_buttonBackgroundColor
to configure it please extend TextAppearance.PayU.Button and put reference to it in payu_styles_textStyleButtonBasic.

ButtonPrimary extends buttonBasic, to utlizie it please extend TextAppearance.PayU.Button.Primary and set reference in field: payu_styles_text StyleButtonPrimary

Input text

Last one is style TextAppearance.PayU.EditText that extends Style.PayU.Fronts.Text

Footer Terms & Condition PayU

To Add PayU Footer with Terms & Condition custom layout please include:
                    <com.payu.android.front.sdk.payment_library_core_android.conditions_view.PayUTermView
                    android:layout_width="match_parent"
                    android:layout_height="wrap_content"
                    />
                
This layout is not customizable via Theme.PayU.Fronts style.

2.7 Installments

General information

To use installments please add new library to gradle file: payment-add-card-module.

UI can be customized using Global class that extends DefaultStyleConfiguration (please check global UI guideline)

Before implementation

Please check if payment can be split into installments.

You should also have implemented (on your backend):
  • Transaction API Call (this card should be takend after OCR, and after merchant backend received completed as transaction status with information about proposalId)
  • Retrieve Proposal API Call (this call have an information regarding possible installments - needed for Mobile SDK)
  • Send Proposal API Call (send selected proposal - this should be called after Mobile Installment flow finishes)
Installments can be taken (and displayed) only after OCR was processed and works for card Payment.

Implementation flow

In your implementation of PaymentMethodActions please override method: override fun provideInstallments(callback: InstallmentCallback) {}

This method is responsible for retrieving installments from merchant API

Sample implementation based on installments documentation

val disposable = installmentRepository.getInstallmentOption(persistenceRepository.proposalId)
    .subscribeOn(Schedulers.io())
    .observeOn(AndroidSchedulers.mainThread())
    .subscribe(
{
if (it.installmentDecision != null) {
    //merchant could display an information regarding this flow
    println("Installment previously taken: $it")
    return@subscribe
}

val installmentList: ArrayList<InstallmentOption> = ArrayList()
    it.installmentOptions.forEach { item ->
    installmentList.add(InstallmentOption.Builder()
    .withId(item.id)
    .withFirstInstallments(item.firstInstallmentAmount ?: 0)
    .withNumberOfInstallments(item.numberOfInstallments ?: 0)
    .withTotalValue(item.totalAmountDue)
    .withAnnualPercentageRate(item.annualPercentageRate)
    .withInstallmentAmount(item.installmentAmount ?: 0)
    .withInstallmentFeeAmount(item.installmentFeeAmount)
    .withInterestRate(item.interestRate)
    .build())
    
    }
    
    val installment: Installment = Installment.Builder()
    .withCurrency(it.currencyCode)
    .withProposalId(persistenceRepository.proposalId)
    .withInstallmentType(it.installmentOptionFormat)
    .withInstallmentOptionList(installmentList)
    .withMaxNumberOfInstallments(it.maxNumberOfInstallments ?: 0)
    .withMinNumberOfInstallments(it.minNumberOfInstallments ?: 0)
    .build()
    callback.onFetched(installment)
    
    }, {
    println("Error during fetching installments: $it")
})


For creating a model we are providing:

com.payu.android.front.sdk.payment_library_core.external.model.Installment.Builder

com.payu.android.front.sdk.payment_library_core.external.model.InstallmentOption.Builder

To trigger installment flow please call:

com.payu.android.front.sdk.payment_installments.mastercard.offer.view.OfferInstallmentsActivity.startForResult(activity: Activity)

Data will be returned in override fun onActivityResult(requestCode: Int, resultCode: Int, data: Intent?) {...}

Returned object:

//type: VARYING_NUMBER_OF_OPTIONS or VARYING_NUMBER_OF_INSTALLMENTS
SelectedInstallment(val id: String, val installmentType: String, val proposalId: String?)


Sample Snippet:

fun onActivityResult(requestCode: Int, resultCode: Int, data: Intent?) {
    when (requestCode) {
    ...
    OfferInstallmentsActivity.INSTALLMENT_REQUEST_CODE -> {
        val selectedInstallment: SelectedInstallment = data.getParcelableExtra(OfferInstallmentsActivity.INSTALLMENT_KEY)
        val installmentSelected: InstallmentSelected =
            if (selectedInstallment.installmentType == InstallmentType.OPTIONS.toString())
                InstallmentSelected(selectedInstallment.id)
            else InstallmentSelected(numberOfInstallments = selectedInstallment.id.toInt())
    //Make a call to request an installment from backend
        viewModel.requestInstallment(installmentSelected, selectedInstallment.proposalId!!)
        Toast.makeText(this, "Installment finished", Toast.LENGTH_SHORT).show()
    }
}
}


In Case when user would like to cancel an installment we will send RESULT_CANCELED and close an installment flow.

Default style of installments screens

Choosing installments:

Choosing number of installments:

Choosing installments option:

2.8 SoftAcceptService (Optional Flow)

This flow is optional. Merchant can check if there is a need to open WebView for handling 3DS Payments.

This flow should be called after OCR (order create request) return WARNING_CONTINUE_3DS. Main purpose of this component is to check if user needs to additional authenticate in WebView.

This is a part of payment_library_webview_module.

Entry Point:

com.payu.android.front.sdk.payment_library_webview_module.soft_accept.external.SoftAcceptService

With two constructors:

/**
* @param dialogBodyMessage    -message on dialog that could be seen by end user - if not provided then user will see default text
* @param fragmentManager      -dialog will be attached using fragmentManager
* @param authorizationDetails -start data for soft accept {@linkplain SoftAcceptTransactionData} - right now it consist of redirect link
* @param isCancelable         - flag that indicate if user can cancel a dialog pressing outside of it. In this case dialog will return {@link SoftAcceptTransactionStatus#AUTHENTICATION_CANCELED}

* To retrieve resonse {@linkplain SoftAcceptTransactionStatus}: there is a need to call getParentFragmentManager().setFragmentResultListener
* Using Key: {@link SoftAcceptService#KEY_REQUEST_BUNDLE}
* Object is stored {@link SoftAcceptService#KEY_SOFT_ACCEPT_RESPONSE_DETAIL}
* Sample in Kotlin:

* supportFragmentManager.setFragmentResultListener(SoftAcceptService.KEY_REQUEST_BUNDLE, this, { _, bundle ->
*   val result = bundle.getParcelable<SoftAcceptTransactionDetail>(SoftAcceptService.KEY_SOFT_ACCEPT_RESPONSE_DETAIL)
*   // Do something with the result
* })
*/
public SoftAcceptService(
    @Nullable String dialogBodyMessage,
    @NonNull FragmentManager fragmentManager,
    @NonNull AuthorizationDetails authorizationDetails,
    boolean isCancelable) {
//init
}
/**
* @param childView            -custom layout, that should be displayed in default layout place, only simple layout are supported
* @param fragmentManager      -dialog will be attached using fragmentManager
* @param authorizationDetails -start data for soft accept {@linkplain SoftAcceptTransactionData} - right now it consist of redirect link
* @param isCancelable         - flag that indicate if user can cancel a dialog pressing outside of it. In this case dialog will return {@link SoftAcceptTransactionStatus#AUTHENTICATION_CANCELED}

* To retrieve resonse {@linkplain SoftAcceptTransactionStatus}: there is a need to call   getParentFragmentManager().setFragmentResultListener
* Using Key: {@link SoftAcceptService#KEY_REQUEST_BUNDLE}
* Object is stored {@link SoftAcceptService#KEY_SOFT_ACCEPT_RESPONSE_DETAIL}
* Sample in Kotlin:

*supportFragmentManager.setFragmentResultListener(SoftAcceptService.KEY_REQUEST_BUNDLE, this, { _, bundle ->
*   val result = bundle.getParcelable<SoftAcceptTransactionDetail>(SoftAcceptService.KEY_SOFT_ACCEPT_RESPONSE_DETAIL)
*   // Do something with the result
*})
*/
                        
public SoftAcceptService(@LayoutRes int childView,
    @NonNull FragmentManager fragmentManager,
    @NonNull AuthorizationDetails authorizationDetails,
    boolean isCancelable) {
//init
}


First constructor will prepare a default dialog to be displayed (with a possibility to change displayed text). This dialog could be customized via provided styles in xml property <string name="payu_style_class_fully_qualified_name"> ... </string> Second constructor will prepare custom view in dialog and merchant is responsible to pass LayoutId.

SoftAcceptService provides two additional methods:

  • public void processSoftAccept() //display dialog & check if payment doesn't need additional action from user
  • public void dismissSoftAccept() //remove dialog

When check will be finished SDK will return an object:

com.payu.android.front.sdk.payment_library_webview_module.soft_accept.external.SoftAcceptTransactionDetail in bundle in SupportFragmentManger

Retrievie information from dialog:

fun retrieveStatusFromSoftAccept() {
    supportFragmentManager.setFragmentResultListener(SoftAcceptService.KEY_REQUEST_BUNDLE, this, { _, bundle ->
        val result = bundle.getParcelable<SoftAcceptTransactionDetail>(SoftAcceptService.KEY_SOFT_ACCEPT_RESPONSE_DETAIL)
        Log.v("SoftAccept", "Response with: " + result?.softAcceptTransactionStatus.toString())
    
    });
}


Additional information regarding the statuses in SoftAcceptTransactionDetail:

  • DISPLAY_FRAME - reveal the iframe if it was hidden.
  • AUTHENTICATION_SUCCESSFUL - challenge has been finished, close the iframe. Note: term SUCCESSFUL has technical sense (no errors occurred), it does not indicate the business outcome (i.e. whether the cardholder has been authenticated).
  • AUTHENTICATION_CANCELED - errors occurred, close the iframe.

You can find more information in handling iframe section.

3 iOS

Documentation for IOS version can be found HERE.